A Comprehensive Guide to Set Up OAuth2 for Outlook Mailboxes Using the Warmy API
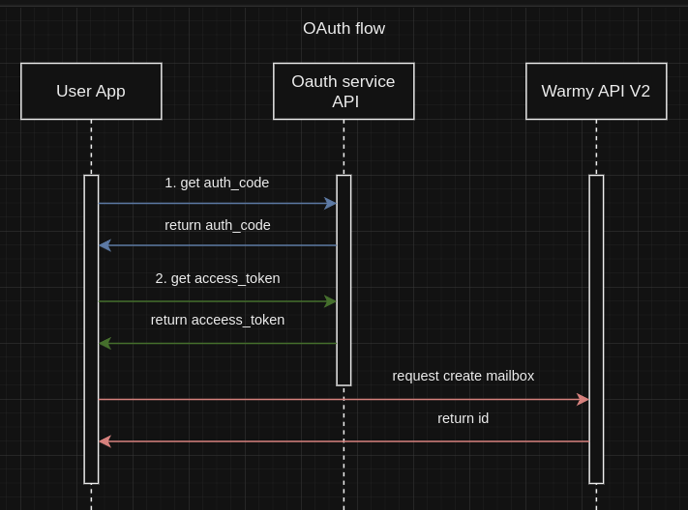
Scheme for Creating OAuth2 Tokens

To integrate your mailboxes using OAuth2, you'll need to create and manage tokens. Below is the required data for connection and how to obtain it:
Required Data for Connection
- client_id: A unique identifier for the application in Azure AD.
- client_secret: The application secret key (used for server-side integrations only).
- access_token: Token for interacting with the API.
- refresh_token: Token to refresh the access_token after it expires.
Example Request for Integration
Here's an example of how to integrate mailboxes with the Warmy API:
curl --location 'https://api.warmy.io/api/v2/mailboxes' \
--header 'client;' \
--header 'access-token;' \
--header 'uid;' \
--header 'holder-uid: a66a9a755fe16f24fcb99dc8b5f25a50' \
--header 'Content-Type: application/json' \
--data '{
  "mailbox": {
    "provider": "oauth_outlook",
    "from_name": "your_from_name_here",
    "client_id":"your_client_id_here",
    "client_secret":"your_client_secret_here",
    "access_token":"your_access_token_here",
    "refresh_token": "your_refresh_token_here",
    "tariff_plan_type_id": 41,
  "setting_attributes": {
    "speed_mode": "fast"
  }
 }
}'
Getting Data by Registering an Application in Azure AD
1. Registering an Application in Azure Active Directory
- Sign in to the Azure Portal.
- Navigate to Azure Active Directory > App Registrations.
- Click New Registration and fill in the required fields:
- Name: Enter your application name.
- Redirect URI: Add a redirect URL (e.g.,
https://yourapp.com/oauth-callback).
- Click Register.
2. Retrieving client_id and client_secret
-
After registration, open the application in App Registrations.
-
Navigate to the Overview tab:
- Copy the Application (client) ID as
client_id.

- Copy the Application (client) ID as
-
Go to Certificates & Secrets > New Client Secret:
- Enter a description (e.g., "Warmy Secret").
- Select an expiration date (e.g., 6 months).
- Click Add and copy the generated value (this is your
client_secret).

⚠️ Note: Save client_secret immediately, as it will not be shown again after the page reloads.
3. Setting Up API Permissions
-
In the API Permissions tab, click Add a permission.
-
Select Microsoft Graph > Delegated permissions and add the following scopes:
- Mail.Read: Access to incoming messages.
- Mail.Send: Ability to send emails.
- offline_access: Permission to receive a refresh_token.
- User.Read: Access user account information.
- Mail.ReadWrite (if you need to modify emails).
-
Click Grant admin consent to confirm the permissions.

OAuth2 Token Generation
Step 1: Receiving auth_code
To get an authorization code (auth_code), use the following URL to redirect the user to the Microsoft authorization page:
https://login.microsoftonline.com/{tenant}/oauth2/v2.0/authorize
Request Parameters
Pass the following parameters to the URL via the query string:
| Parameter | Description |
|---|---|
client_id |
Application identifier obtained during Azure registration. |
response_type |
Use code to request an authorization code. |
redirect_uri |
URL to redirect after successful authorization (must match the Azure AD app settings). |
scope |
Permissions requested (e.g., offline_access https://graph.microsoft.com/.default). |
state |
(Optional) Unique parameter to identify the session. |
A tenant is an identifier or domain for the organization in Azure (for example: common, organizations, or specific ID). A tenant can be found in the Azure Portal under Azure Active Directory > Overview.
An example of a query to get auth_code:
https://login.microsoftonline.com/{tenant}/oauth2/v2.0/authorize?client_id={client_id}&response_type=code&redirect_uri={redirect_uri}&scope={scope}&state={state}
-
Follow the link and log in to your Microsoft account.
-
After authorization, you are redirected to the specified
redirect_uriwithauth_codein the query string. -
The response will return the
auth_codein the request parameters, example:https://your-redirect-uri.com/?code={auth_code}&state={state}
Step 2: Exchanging auth_code for access_token
Send a POST request to exchange the auth_code for an access_token:
POST https://login.microsoftonline.com/{tenant}/oauth2/v2.0/token
Content-Type: application/x-www-form-urlencoded
Request Parameters:
client_id={client_id}
&scope=https%3A%2F%2Fgraph.microsoft.com%2FMail.Read%20https%3A%2F%2Fgraph.microsoft.com%2FMail.Send%20https%3A%2F%2Fgraph.microsoft.com%2Foffline_access%20https%3A%2F%2Fgraph.microsoft.com%2FUser.Read
&code={authorization_code}
&redirect_uri={redirect_uri}
&grant_type=authorization_code
&client_secret={client_secret}
A successful response will include:
access_token: A token obtained during authentication, used for authorizing API requests and verifying the user's identity.refresh_token: To refresh theaccess_token.expires_in: The lifetime of theaccess_tokenin seconds.
Step 3: Update access_token (if necessary)
Send a POST request to the same endpoint /token, but with the parameter:
grant_type=refresh_token
&refresh_token={refresh_token}
Common Errors and Solutions
| Error | Solution |
|---|---|
| Invalid redirect URI | Ensure the redirect_uri matches the one registered in Azure AD. |
| Invalid client secret | Verify the client_secret is correct and hasn't expired. |
| Repeated consent prompts | Confirm admin rights via Grant admin consent in the Azure portal. |
| Prompt=consent issue | The prompt=consent parameter explicitly forces the consent screen to appear, regardless of whether the permissions have already been granted or skipped through configuration. If this parameter is included in the authorization request, the user or administrator will always be prompted to approve the requested permissions again. Remove this parameter unless you explicitly need to re-request consent. |
To manage expectations, changes made in Microsoft Entra/Azure Admin Center typically take effect instantly or within a few minutes. However, in some cases, it can take anywhere from 1 to 24 hours for the changes to fully process
Conclusion
By following these steps, you can securely integrate Outlook mailboxes with Warmy.io using OAuth2 authentication. This integration ensures seamless email operations while maintaining security and scalability.
