![Group 1261151152.png]](https://support.warmy.io/hs-fs/hubfs/Group%201261151152.png?width=50&height=50&name=Group%201261151152.png)
🎧 Prefer to listen? Hit play to hear this article read aloud. 🔊
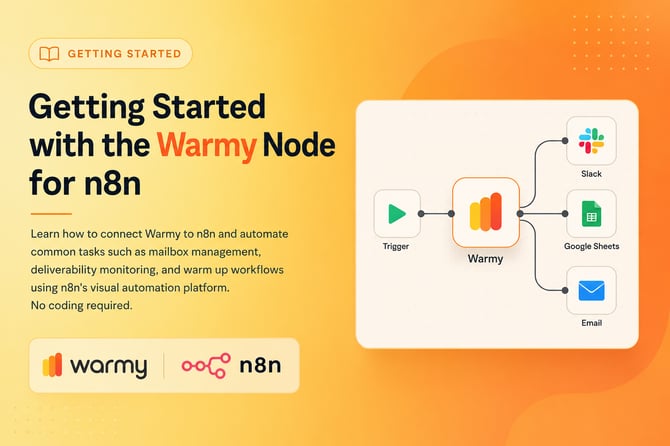
What's n8n?
n8n is a workflow automation tool that helps you connect different apps and automate repetitive tasks. Think of it as a visual workspace where you can create automated processes without writing code.
The Warmy node for n8n allows you to connect your Warmy account to these automated workflows and manage certain tasks automatically.
With it, you can:
• Automatically create and manage mailboxes without having to log in to the Warmy dashboard.
• Run deliverability checks on a schedule and send the results to Slack, email, or a spreadsheet.
• Connect Warmy with your CRM so new leads can automatically be added to your warm up process.
• Collect warm up statistics and display them in reports or dashboards.
No coding is required. Everything is done through n8n's visual drag and drop interface, where you simply connect steps and fill in the required fields.
Now, let's see how to install the Warmy Node in n8n.
Install the Warmy Node
You only need to do this once. It takes about 2 minutes.
-
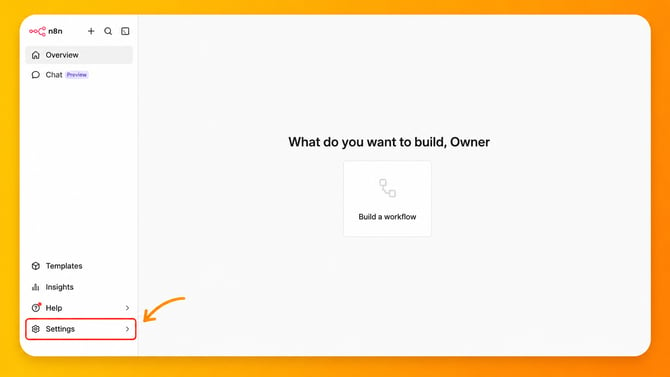
Open your n8n instance and click on Settings in the left sidebar.
-
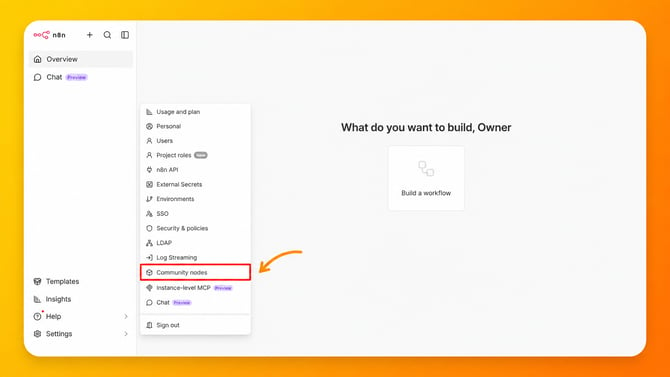
Click on Community Nodes.
-
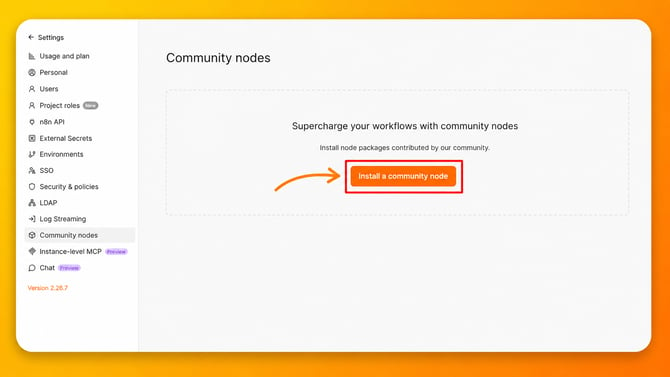
Click on the orange Install a community node button.
-
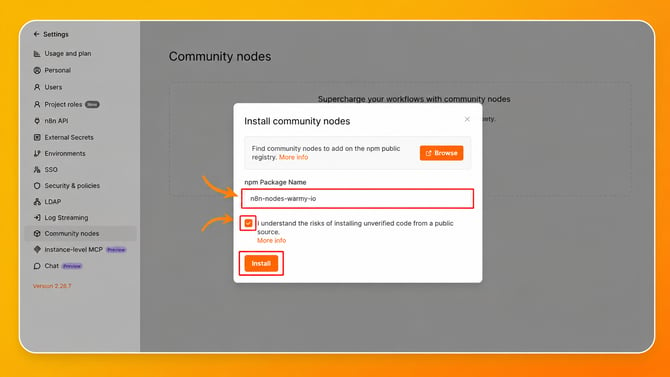
A window will open. In the npm Package Name field, type exactly:
n8n-nodes-warmy-ioTick the checkbox to acknowledge that you are installing unverified code from a public source.
Click Install and wait for the green confirmation message.
-
After the installation is complete, you should see a confirmation message in the bottom right corner of the screen that says "Package installed". You should also see n8n-nodes-warmy-io listed in the Community Nodes section, confirming that the Warmy Node has been installed successfully.

Now, you need to...
Connect Your Warmy Account
Before you can use the Warmy Node in n8n, you first need to connect it to your Warmy account.
To do this, complete the following two steps:
- Obtain your Warmy API Key and enter the Holder UID from your Warmy account. The Holder UID you need to use is this:
a66a9a755fe16f24fcb99dc8b5f25a50(for API Documentation click here)
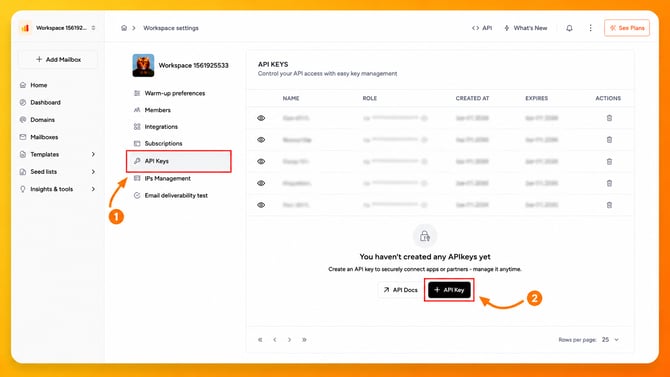
To generate an API Key, log in to your Warmy account and select the appropriate Workspace. If you only have one Workspace, it will be selected automatically. If you manage multiple Workspaces, make sure to select the Workspace you want to connect to n8n. Once you have selected the correct Workspace, click on Settings.

-
A new menu will appear in the center of the screen. From there, select API Keys and click the black + API Key button.
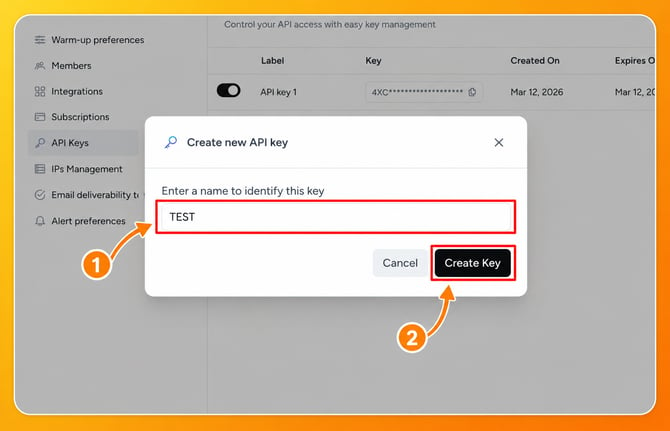
A small window will then open. Enter a name to help you identify this API Key later. You can choose any name you like. For this example, we'll use TEST. After entering the name, click Create Key to generate your API Key.
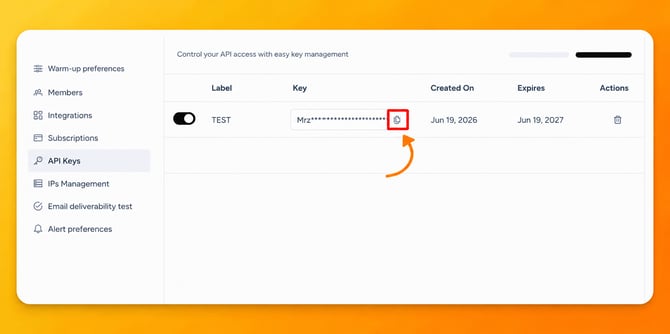
- Once the API Key has been created, click the Copy icon to copy it to your clipboard. This is the API Key you will use later when configuring your Warmy credentials in n8n.
Remember the Holder UID is: a66a9a755fe16f24fcb99dc8b5f25a50
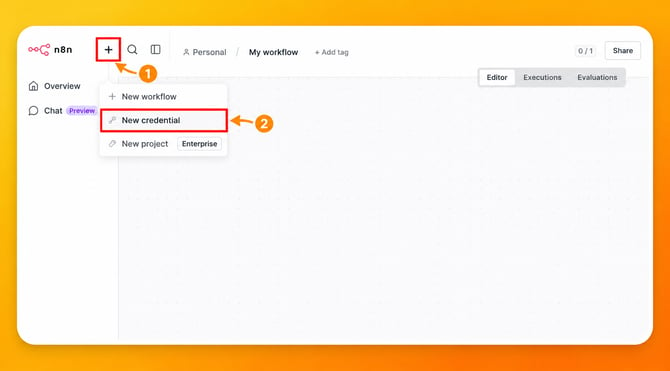
Add a New Credential in n8n
-
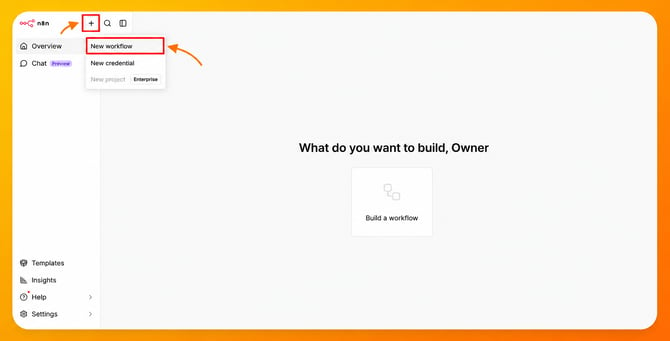
To create a new credential in n8n, click the + icon located at the top of the left sidebar. A menu will appear. From that menu, click on New Credential to open the credential setup screen.
-
A new window will appear. In the "Search for app..." field, type Warmy API.
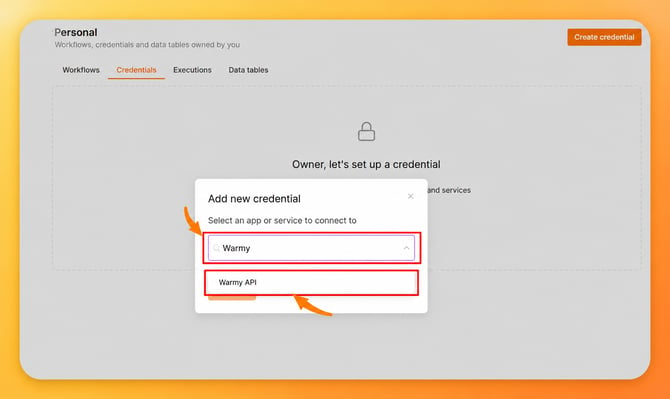
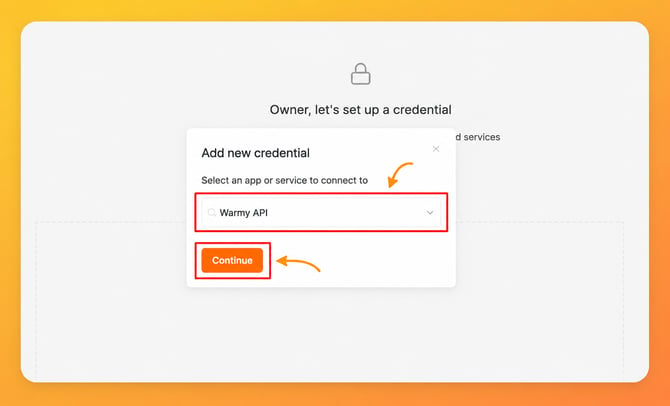
- Once the search results are displayed, select Warmy API from the list and click Continue.
- You will now see a new window with a few fields to complete. The first field is API Token, which is the same as your API Key. This is the API Key you generated earlier from your Warmy account by navigating to Workspace > Settings > API Keys. The second field is for the Holder UID which is:
a66a9a755fe16f24fcb99dc8b5f25a50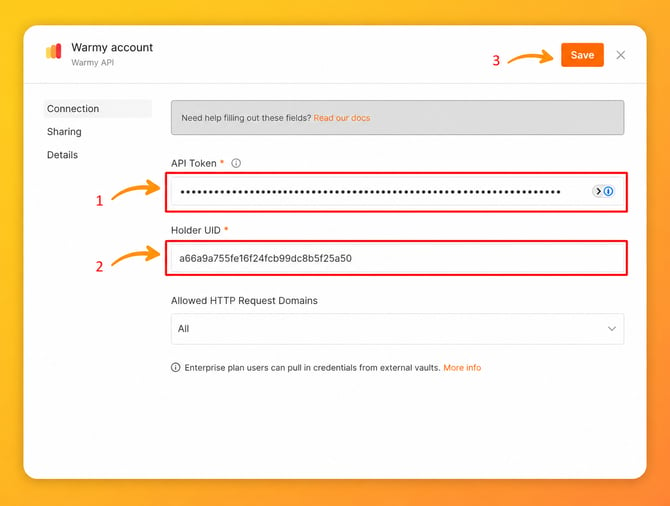
- If the information you entered is correct and the connection test is successful, you should see a confirmation message similar to the one shown below. Once the credential has been successfully saved, you can safely close the window and continue with your workflow setup.
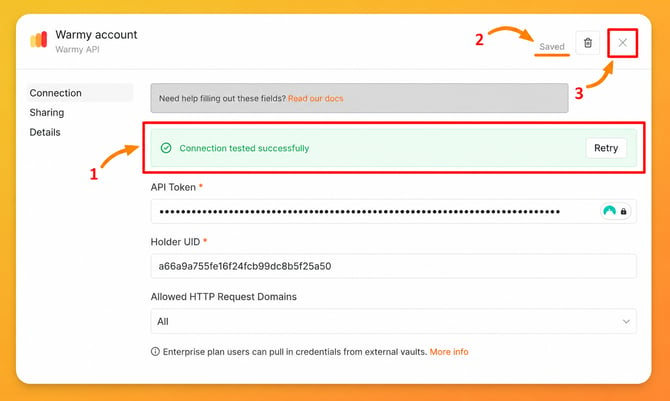
API Token is the same as API Key
Holder UID: a66a9a755fe16f24fcb99dc8b5f25a50
For more information about the Warmy API, please refer to the: API Documentation
Once both steps are complete, the Warmy Node will be able to securely communicate with your Warmy account, and you'll be ready to start building automated workflows.
You only need to set up these credentials once. After that, you can reuse them across all Warmy nodes in your workflows without entering them again.
The Warmy Node is organized into different resources. You can think of each resource as a specific area or feature of your Warmy account that you can interact with through n8n.
| Resource | What it does? | Example actions |
| Mailbox | Manage your email mailboxes |
Create a mailbox, check its status, update warm-up speed |
|
Deliverability Checker |
Test whether your emails land in Inbox |
Run a check, see inbox vs. spam results |
|
Standalone Deliverability Checker |
View and manage seed-address lists |
See which seed addresses are in your splits |
| SeedList |
Quick one-off deliverability tests |
Create a test, get results |
| User Template |
Manage email templates |
Create, update or list your templates |
| Custom API Call |
Advanced: call any Warmy API endpoint |
Access features not yet in the node |
Now that your Warmy account is connected to n8n, you're ready to build your first workflow.
We will present and example of use and in this example, you'll learn how to use the Warmy Node to create a mailbox directly from n8n.
Create a Mailbox - Example of Use
-
To get started, create a new workflow. Click the + icon located at the top of the left sidebar. A menu will appear. From the available options, select New Workflow to create a blank workflow.
-
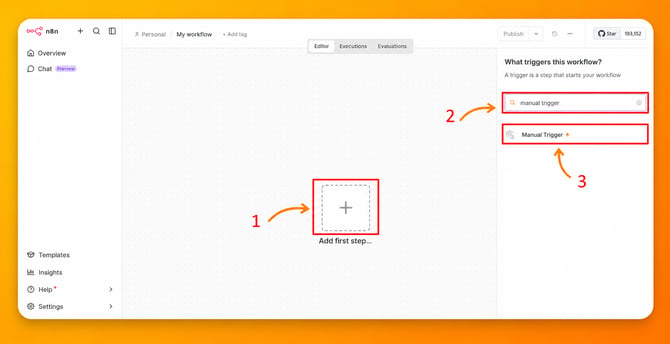
Next, click Add First Step to begin building your workflow. This will open the node selection panel, where you can choose the first action for your workflow.
In the "Search nodes..." field, type Manual Trigger. Once the node appears in the search results, click on it to add it to your workflow.
-
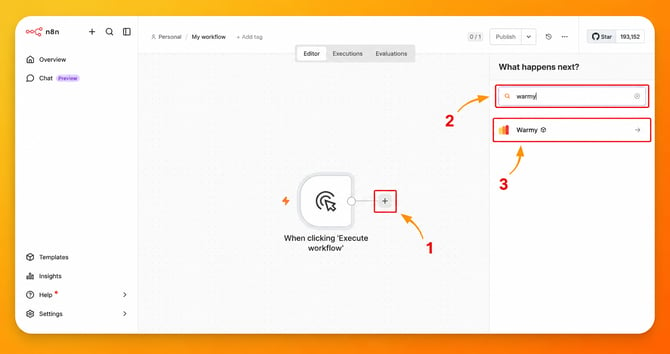
Next, click the + icon located on the right side of the Manual Trigger node. This will open the node selection panel.
In the "Search nodes..." field, type Warmy. When the Warmy option appears in the search results, click on it.
- You will see a list of available actions for the Warmy node. Locate Create a Mailbox and click on it to select it as the action for this workflow.

- A new windows will be shown and there you need to configure some settings like:
Field Value Credential
Earlier in this guide, we showed you how to create a new credential in n8n. When you click the Credentials dropdown, you should see the credential you created in the previous steps. Select that credential to allow the Warmy node to connect to your Warmy account. Resource
Mailbox Operation
Select "Create a new mailbox" Provider
Select your email provider (Gmail, Outlook or any other) Email
Your mailbox address Tariff Plan
The plan or subscription you have (Starter or any other) Password
Your mailbox password / app password 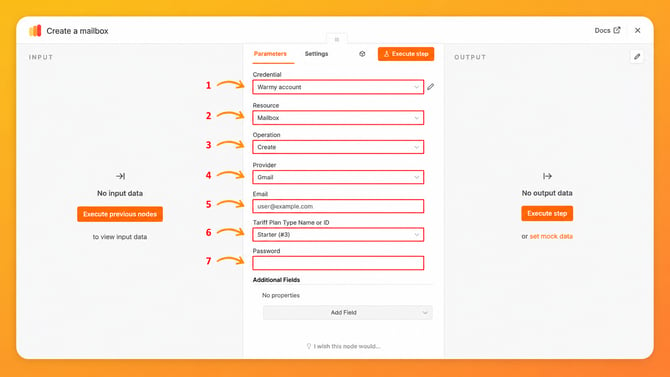
-
You will need to add two additional fields to complete the mailbox configuration.
Click Add Field to view the available options. From the list, add From Name and Setting: Speed Mode. Once added, both fields will appear in the configuration form and be ready to be filled in with the information mentioned in the table below.
Field Value you need to set From Name Here you can set your name (Example: George) Setting: Speed Mode Select "Medium" 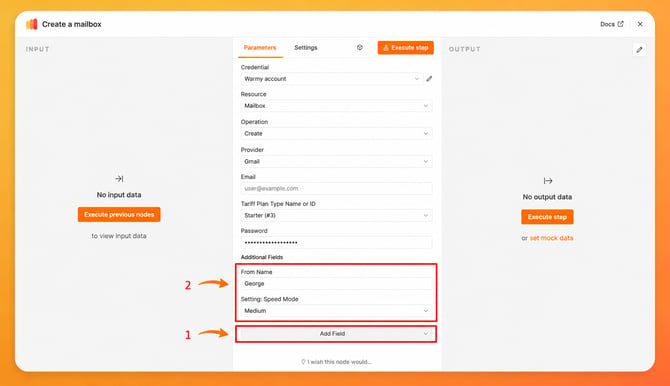
-
As last step, you need to test if all configuration is correct and if everything is working fine now. Click Execute Step button to test your workflow.
If everything has been configured correctly, the request will run successfully. You can verify the result in the Output panel on the right side of the screen, where you should see a response similar to this:
{
  "message": "Your mailbox successfully added",
  "data": {
    "id": 327632,
    "tariff_plan_type_id": 1
  }
}
This confirms that the mailbox was successfully created in your Warmy account.
-
Finally, click Save Workflow to save your changes. That's it. Your first Warmy automation is now ready to use.