![Group 1261151152.png]](https://support.warmy.io/hs-fs/hubfs/Group%201261151152.png?width=50&height=50&name=Group%201261151152.png)
🎧 Prefer to listen? Hit play to hear this article read aloud. 🔊
🔗 How to Connect SparkPost SMTP to Warmy
To start warming up your email with Warmy using SparkPost, you need to fill out the SMTP connection form inside our product. You may locate it by clicking on the +Mailbox button in the top right corner of the dashboard. 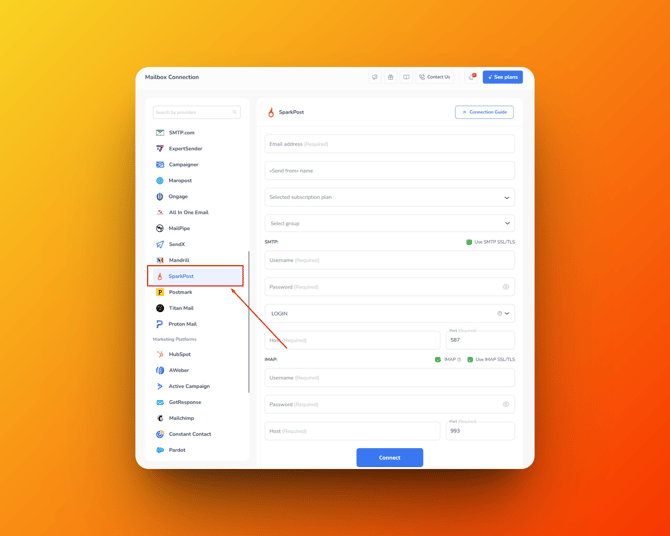
1️⃣ Basic Warmy Settings
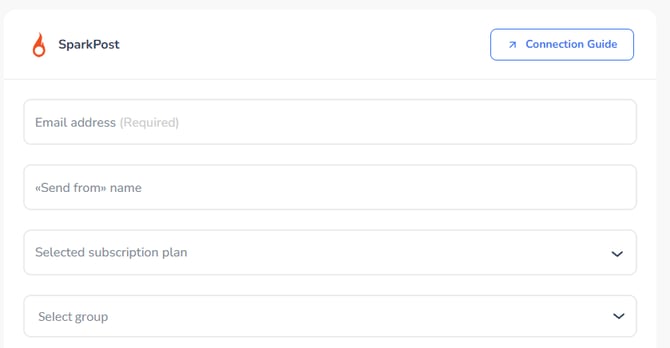
In the connection form (see screenshot), please fill in the following:
-
Email address – enter the email address you want to warm up.
-
«Send from» name – choose a name or phrase that will appear as the sender in all warm-up emails.
-
Selected subscription plan – pick your subscription plan.
-
Select group – if you use groups in Warmy, choose the one you want
2️⃣ SparkPost SMTP Settings
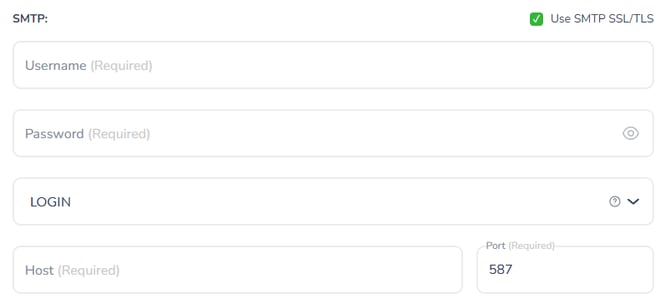
Next, enter your SparkPost SMTP credentials. Use the following values:
-
Host:
-
smtp.sparkpostmail.com -
smtp.eu.sparkpostmail.com(for SparkPost EU accounts)
-
-
Port:
-
587(recommended) -
2525(alternative, if 587 is blocked)
-
-
Encryption:
STARTTLScheckmark is set by default -
Authentication:
LOGIN -
Username:
SMTP_Injection-
For subaccounts, use:
SMTP_Injection:X-MSYS-SUBACCOUNT=123(replace
123with your subaccount ID).
-
-
Password: An API Key with "Send via SMTP" permission - you can create/manage API keys in the app (EU)
Once all fields are filled, click Connect ✅
SparkPost Enterprise customers should contact their Technical Account Manager for SMTP connection details
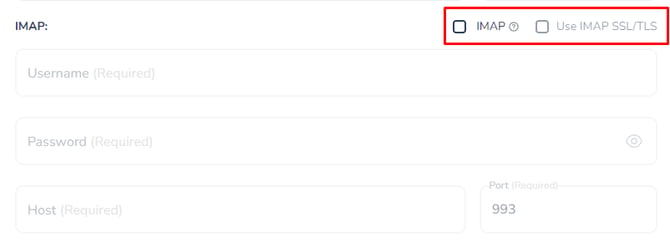
3️⃣ IMAP Option (Optional)
-
The IMAP option can be left disabled – it is only responsible for receiving warm-up emails, and it’s not required for sending.
-
However, if you want to enable IMAP, you can connect any mailbox that supports IMAP, for example, a Gmail inbox. This way, Warmy will also simulate receiving and replying during the warm-up process.
4️⃣ Extra Options
-
Custom headers – If you need to use a custom header (e.g.,
X-MSYS-APIfor campaign IDs, metadata, IP pools, CC, BCC, etc.), just contact our Support team. We’ll be happy to help and enable it for you. -
Subaccounts – When sending on behalf of a subaccount, make sure to use the correct subaccount ID in the username and a valid API key from the parent account as the password.