DomainKeys Identified Mail (DKIM) is an email authentication method that helps protect your Microsoft 365 domain from spoofing and phishing attacks by verifying that emails are sent from authorized server
Steps to Set Up DKIM in Microsoft 365
1. Generate DKIM CNAME Records
- Log in to the Defender Portal: Go to https://security.microsoft.com.
- Navigate to Email Authentication Settings: Go to Email & collaboration > Policies & rules > Threat policies > Email authentication settings.
- Select DKIM Tab: Choose the custom domain to configure.
- Create CNAME Records:
- Hostname:
selector1._domainkey - Points to address:
selector1-<CustomDomain>._domainkey.<InitialDomain> - Hostname:
selector2._domainkey - Points to address:
selector2-<CustomDomain>._domainkey.<InitialDomain>
- Hostname:
2. Configure DKIM Signing
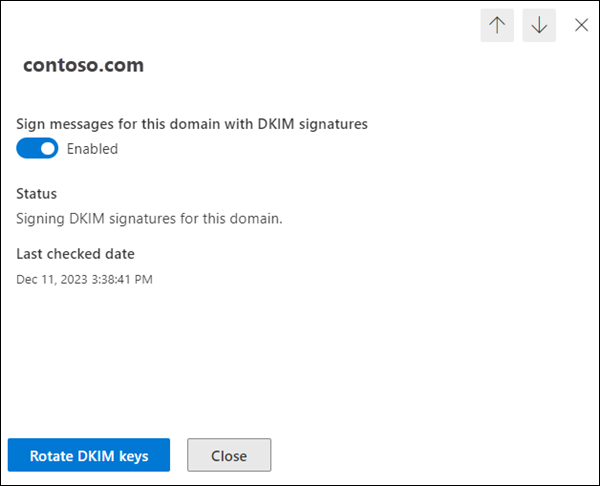
- Enable DKIM Signing: In the domain details flyout, toggle "Sign messages for this domain with DKIM signatures" to Enabled.
- Verify Configuration: Ensure the status shows "Signing DKIM signatures for this domain."
3. Verify DKIM Configuration
- Check DNS Propagation: Wait for DNS changes to propagate, which can take a few minutes to 4 days.
- Confirm in Defender Portal: Verify the DKIM status is updated in the Email authentication settings.
Additional Tips
- SPF and DMARC: For maximum protection, configure SPF and DMARC along with DKIM.
- Subdomains: Configure DKIM for each subdomain used for sending emails.
By following these steps, you can effectively set up DKIM for your Microsoft 365 domain, enhancing your email security and protecting against phishing and spoofing attacks.

