![Group 1261151152.png]](https://support.warmy.io/hs-fs/hubfs/Group%201261151152.png?width=50&height=50&name=Group%201261151152.png)
👀 Please take a look in the video with the steps if you need any help 😎
Managing and Synchronizing Warmy Seedlists Across Email Element
The first step is creating one or more Contact Lists in EmailElement. These Contact Lists will be used by the workflow to synchronize your Warmy seed email addresses.
Option 1: Access Contact Lists Directly
Open the following URL in your browser: https://portal.emailelement.com/contactlists
Option 2: Access Contact Lists from the Dashboard
Alternatively, sign in to your EmailElement account. From the left-hand navigation menu, click Contact Lists.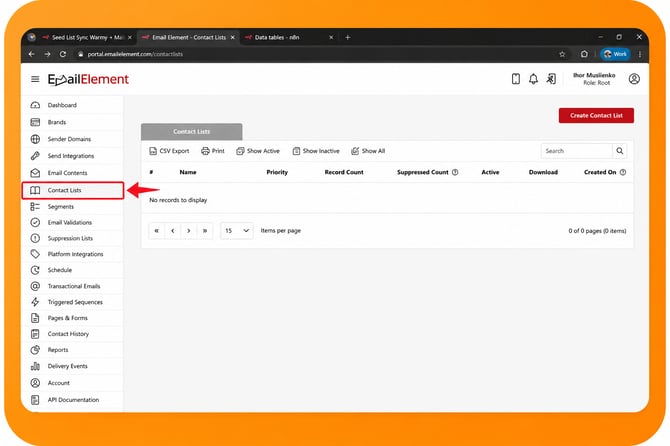
Both options will take you to the same Contact Lists page.
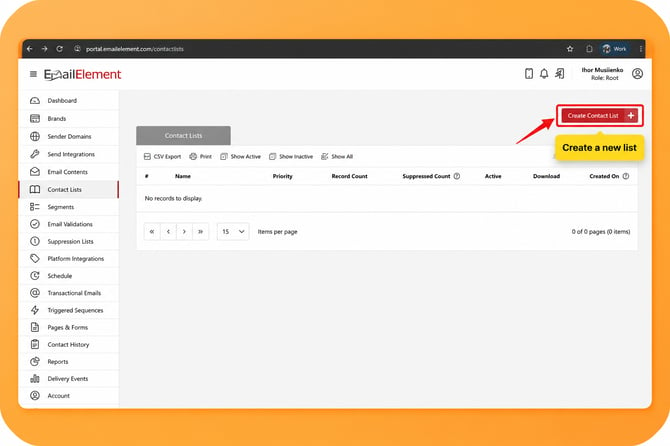
Once you're on the Contact Lists page, click the red Create Contact List button.
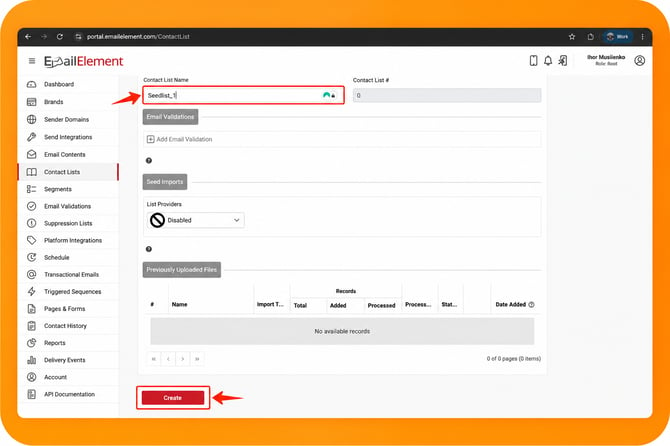
A new page will open where you'll be asked to provide a name for the Contact List and locate the Contact List Name field and enter a descriptive name.
After entering the name, scroll to the bottom of the page and click the red Create button.
You can create as many Contact Lists as your workflow requires. For this example, we'll create a second contact list.
Return to Contact Lists from the left-hand navigation menu and click the red Create Contact List button once again. This time, enter the following name: Seedlist_2
Scroll to the bottom of the page and click Create.
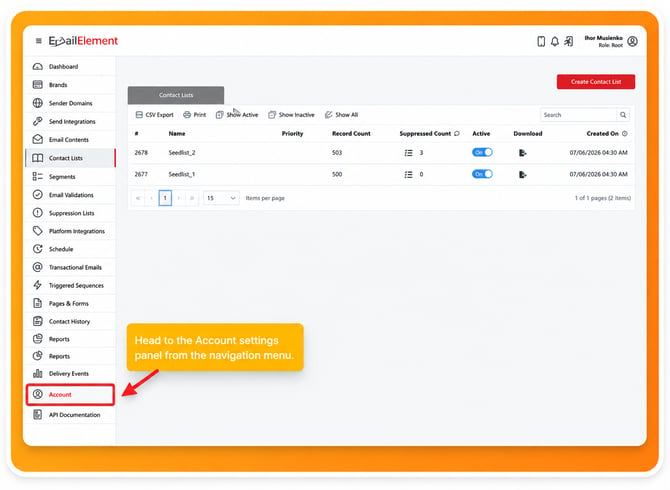
Navigate back to Contact Lists. You should now see both Contact Lists listed in the table.
For this example, you should have:
- Seedlist_1
- Seedlist_2
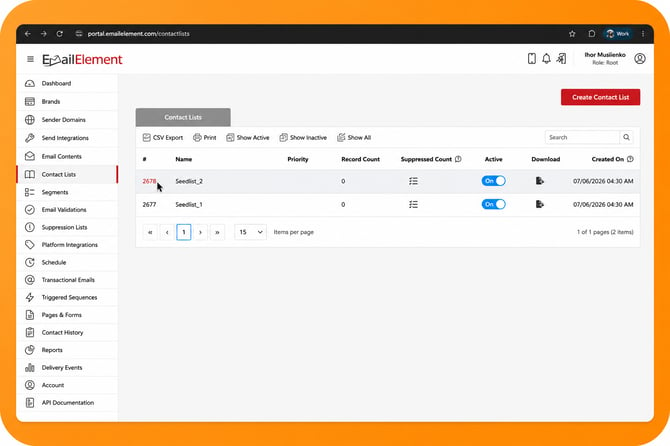
Now locate the Contact List IDs. Each Contact List has a unique ID displayed in the first column of the table. For example:
| Contact List | Contact List ID |
|---|---|
| Seedlist_1 | 2677 |
| Seedlist_2 | 2678 |
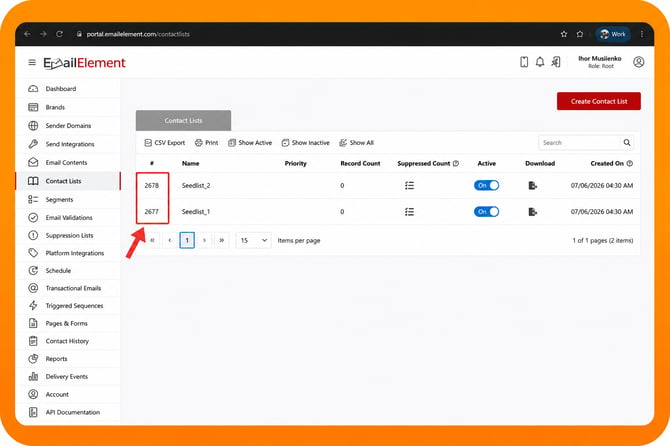
Important: Each Contact List ID is unique. You'll need these IDs later when configuring the mapping inside your n8n workflow, so keep them handy before moving to the next section.
Now that your Contact Lists have been created, it's time to configure your n8n workflow so it knows which contact list should receive the synchronized seed email addresses.
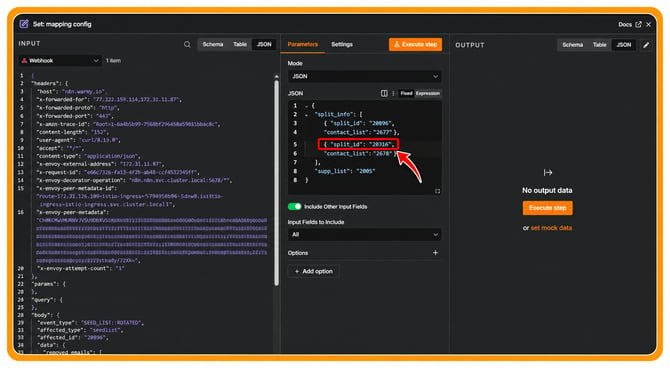
Open your n8n workflow, locate the node named: Set: Mapping Config, and click the node to open its configuration.
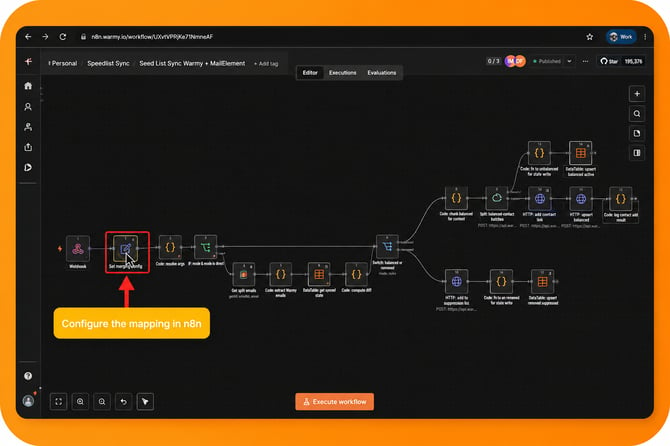
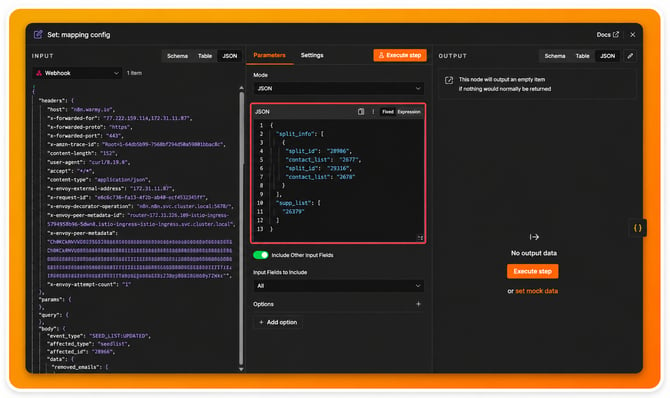
Inside the node, locate the Mode section. Make sure the editor is displaying the configuration in JSON format. Within the JSON configuration, locate the following property: "contact_list":
This value specifies the EmailElement Contact List where the workflow will synchronize your seed email addresses.
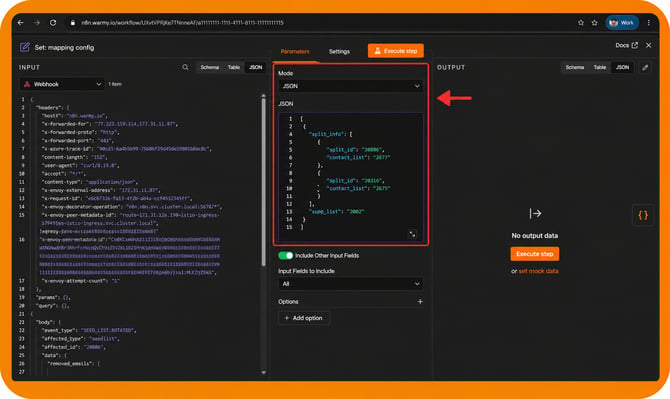
Now delete the existing value assigned to contact_list and replace it with the ID of the Contact List you created earlier. For this article, we'll use the ID assigned to Seedlist_1.
Example: "contact_list":2678
If you're using a different Contact List, simply replace 2678 with your own Contact List ID.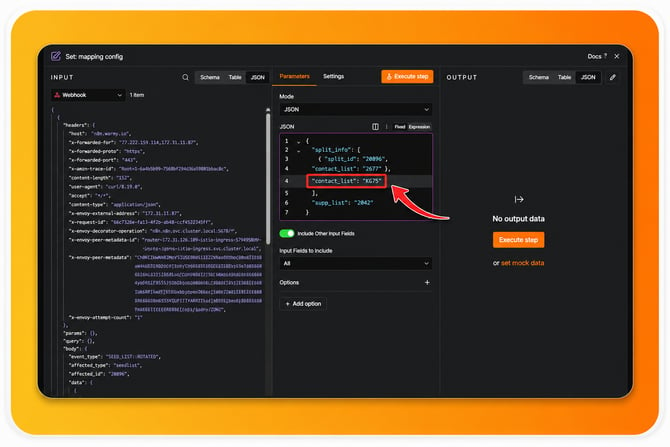
Note: Don't close the Mapping Config window yet. Additional values will be configured later in this article.
The next step is return to your Email Element dashboard. From the left-hand navigation menu, click Suppression Lists.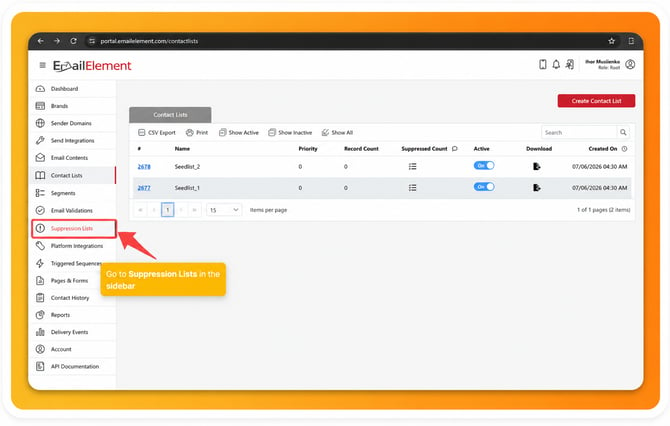
Now, click the red Create Suppression List button, and a new page will open. Locate the Suppression List Name field and enter a name that helps you easily identify the list.
For this guide, we'll use: Seedlist supp.
Scroll to the bottom of the page and click Create.
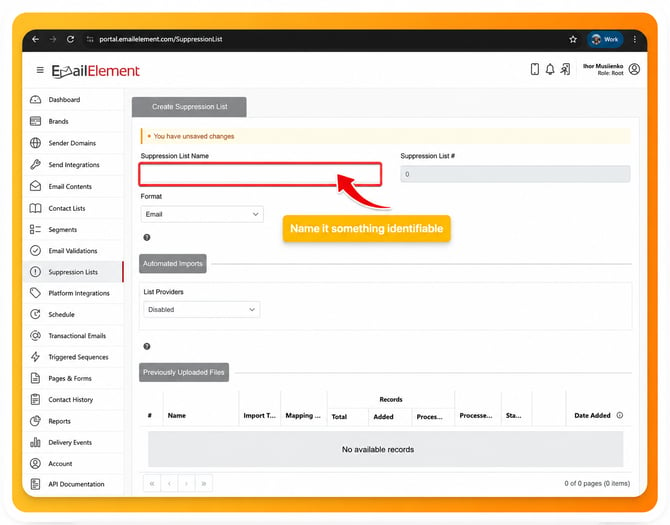
Once the Suppression List has been created, you'll be redirected to its details page. You'll notice a Record Count: 0 indicator along with two switches:
- Global
- Active
Enable the Global switch. A confirmation dialog will appear, and you need click Confirm to continue.
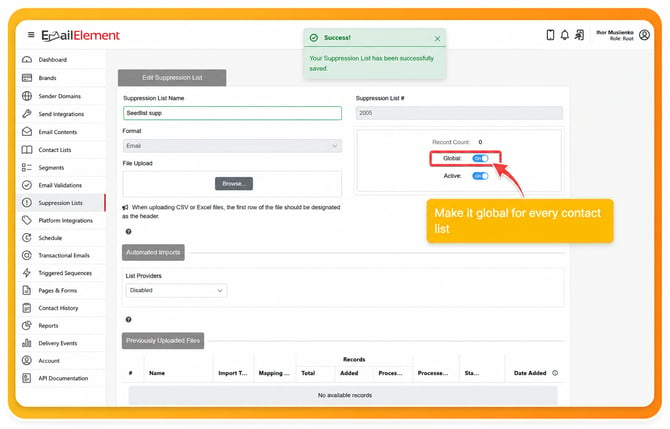
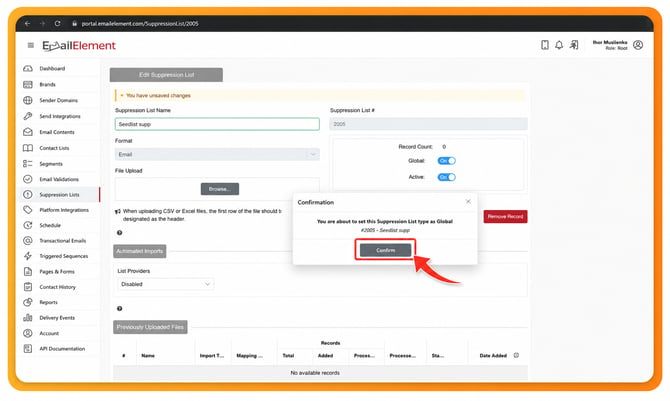
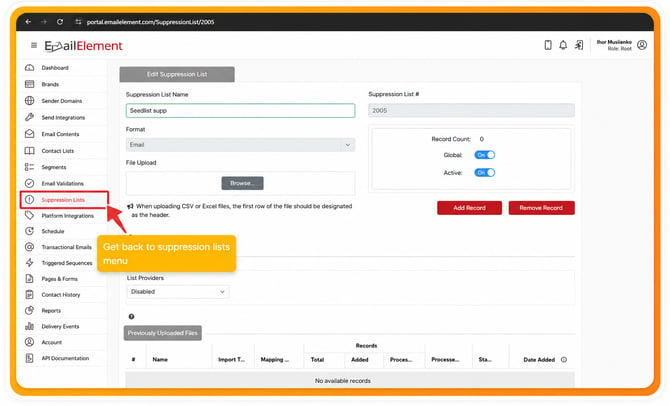
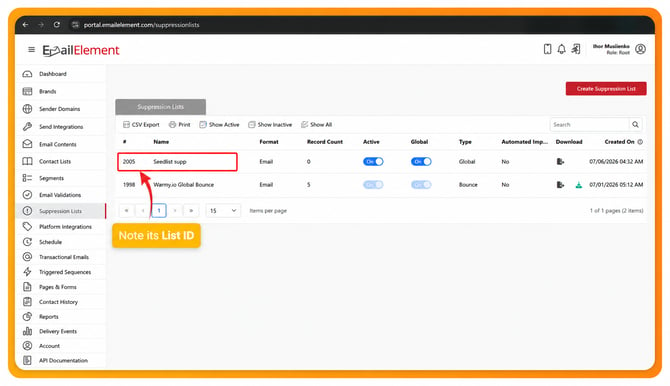
Once confirmed, return to Suppression Lists using the left-hand navigation menu. Locate the suppression list you just created. Just like contact lists, every Suppression List has its own unique ID displayed in the first column of the table.
Copy this ID, as it will be required in the next section when configuring the Mapping Config node inside your n8n workflow.
Return to your n8n workflow and reopen the Set: Mapping Config node if you've already closed it. Inside the JSON configuration, locate the following property "supp_list":
Replace the existing value with the ID of the Suppression List you created in EmailElement. This allows the workflow to automatically manage suppressed seed email addresses using the correct Suppression List.
Next, locate the following property "split_id":
To obtain this value, open your Warmy account and navigate to the Splits section. Copy the ID of the Split you want to use for this synchronization.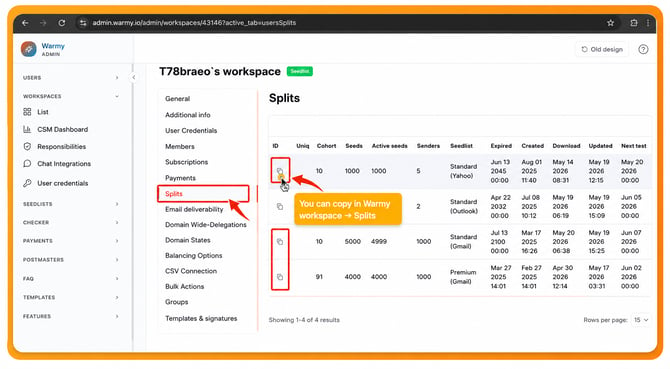
Return to the JSON configuration in n8n and replace the existing value with the Split ID you copied. After updating both values, review the JSON configuration to ensure everything is correct.
Once you've confirmed the configuration, close the Mapping Config window by clicking the X button in the upper-right corner.
The mapping configuration is now complete, and you're ready to continue with the webhook configuration.
Now that the mapping configuration is complete, the next step is to configure the webhook that will allow Warmy to notify your n8n workflow whenever a seed list event occurs.
Return to your n8n workflow, locate the node named: Webhook.
This node acts as the trigger for your automation. Click the node to open its configuration.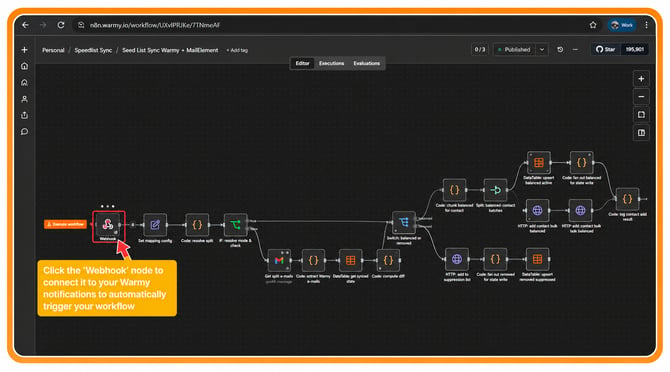
Inside the Webhook node, locate the Production URL button. Click it to display the production endpoint. A POST URL will appear.
Copy the entire URL, as you'll use it in the next step when configuring Warmy notifications.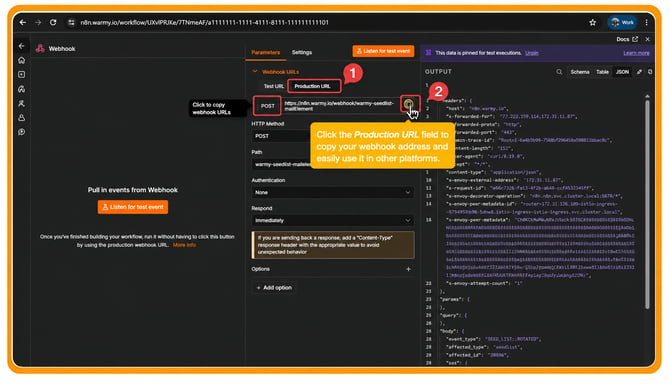
Important: Make sure you copy the Production URL, not the Test URL.
To configure the Webhook in Warmy, open your Warmy dashboard in a new browser tab.
From the left-hand navigation menu, click Notifications Hub.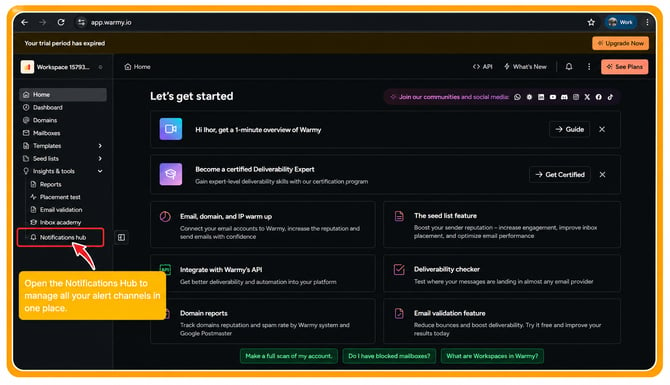
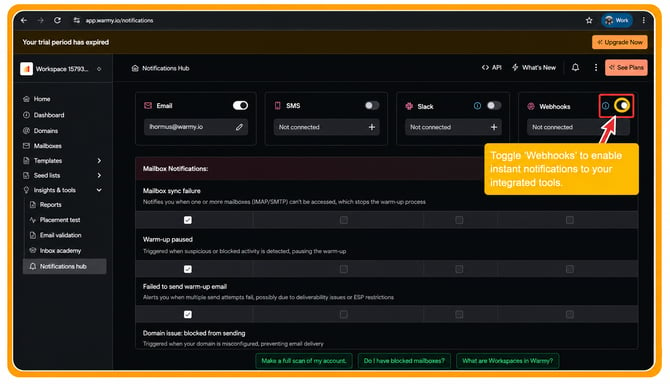
The Notifications Hub displays all available notification channels. Locate the Webhooks card and enable the Webhooks integration by turning on the switch.
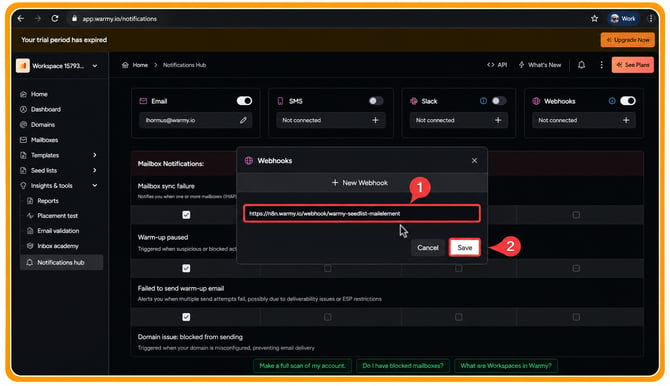
Once enabled, a configuration window will appear. Paste the Production Webhook URL that you copied from n8n into the URL field. Click Save to apply the changes.
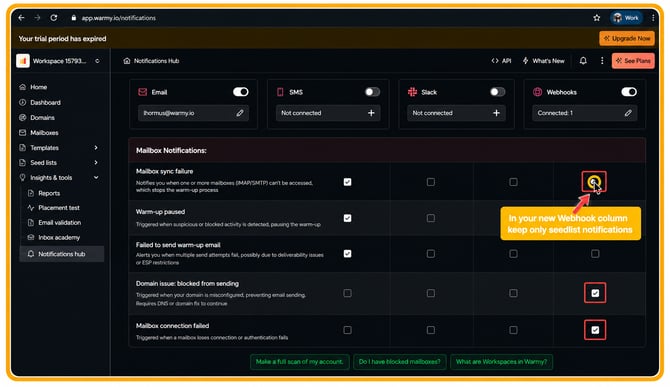
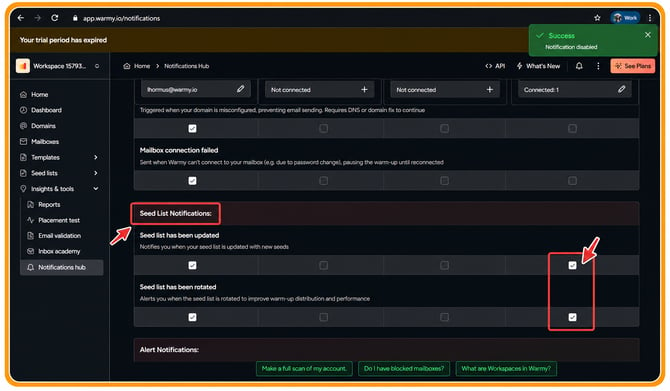
After saving the webhook URL, you'll see several notification events available. For this workflow, leave Seedlist Notification enabled. Disable any other notification events that are currently selected.
This ensures that only the required webhook events are sent to your n8n workflow. Your webhook configuration is now complete.
Important: Keep your Warmy dashboard open. You'll use it again in the next steps to generate your API credentials.
To configure the Warmy Node Credentials, return to your n8n workflow.
Close the Webhook node if it's still open. Locate the node named: Warmy
Click the node to open its configuration. Inside the node, locate the Credentials field, click the pencil icon to edit the existing credentials. If you've already configured your credentials, you'll see fields for:
- API Token
- Holder UID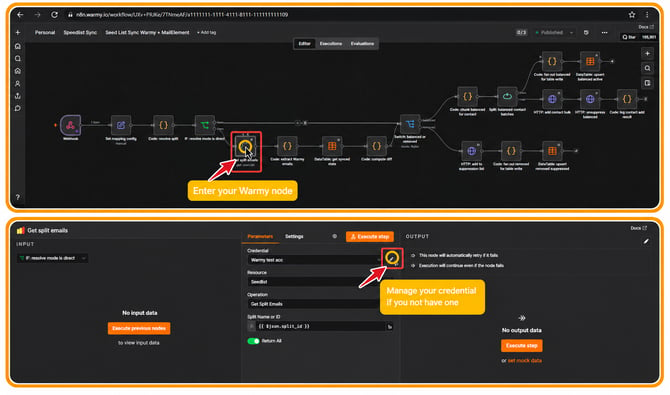
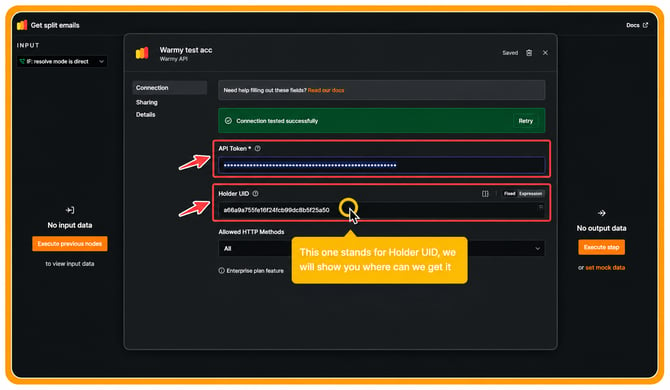
If you haven't created these credentials yet, follow the steps below.
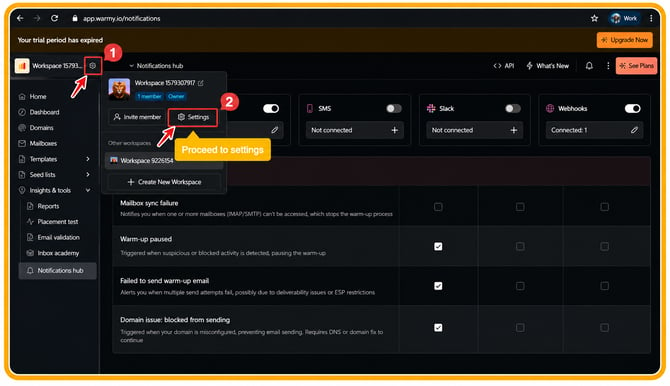
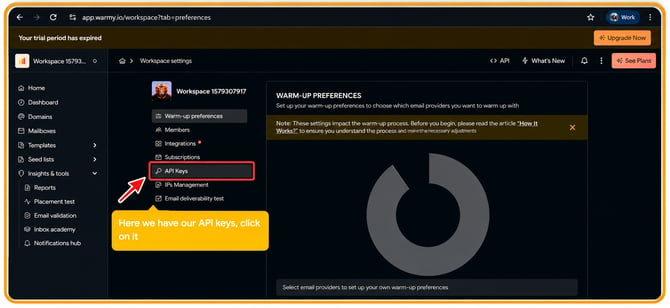
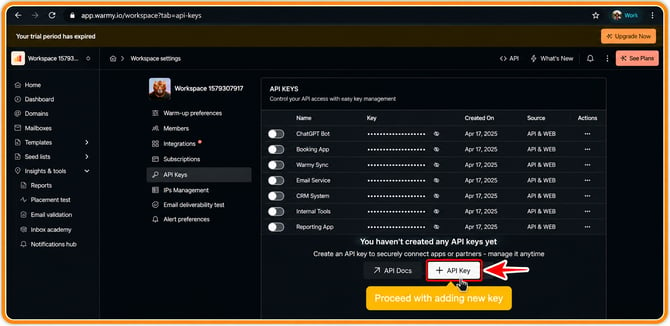
Return to your Warmy dashboard and expand your current Workspace by clicking its name. A menu will appear; click Settings. Inside the Settings page, select API Keys.
Click the + API Key button. A new window will open; enter a name that will help you identify this API key.
For this guide, we'll use: MailElement Update/Rotate n8n Workflow, and click Create Key.
Once the key has been generated, copy the API Key. Keep it somewhere safe, as you'll need it immediately in the next step.
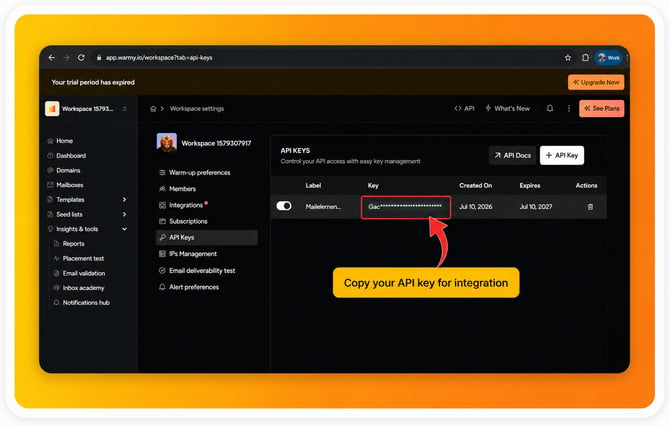
Now, return to the Credentials window you previously opened in n8n. Locate the API Token field. Remove the existing value, if any. Paste the API Key you copied from Warmy.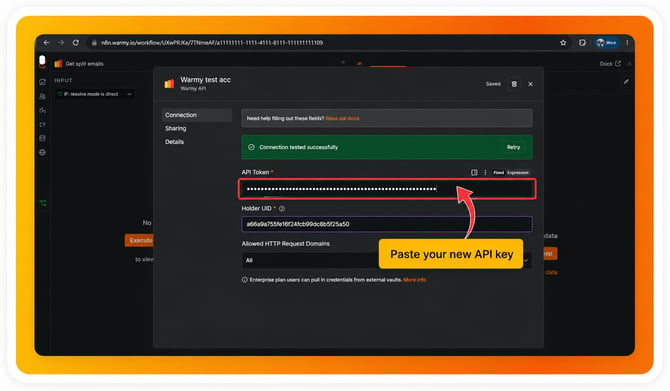
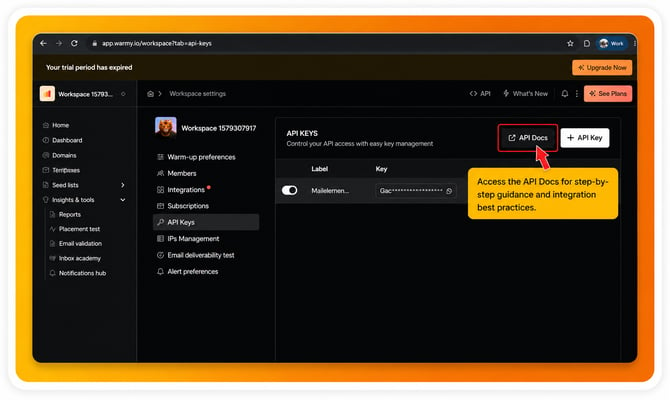
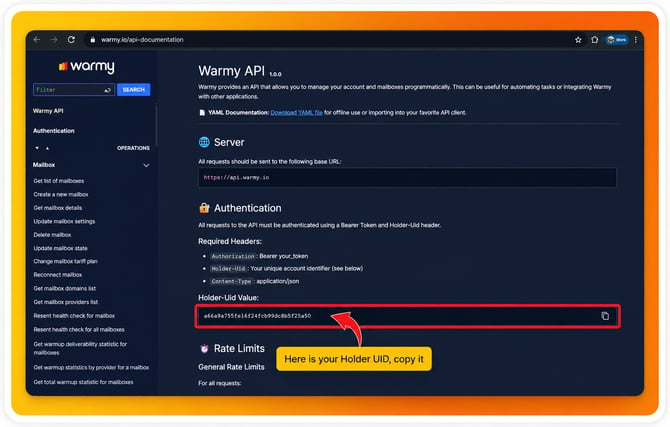
Next, you'll need your Holder UID. Return to your Warmy account and open the API Docs page.
This will redirect you to the Warmy API documentation. Locate the section labeled: Holder-Uid Value, copy the value displayed there and return to n8n.
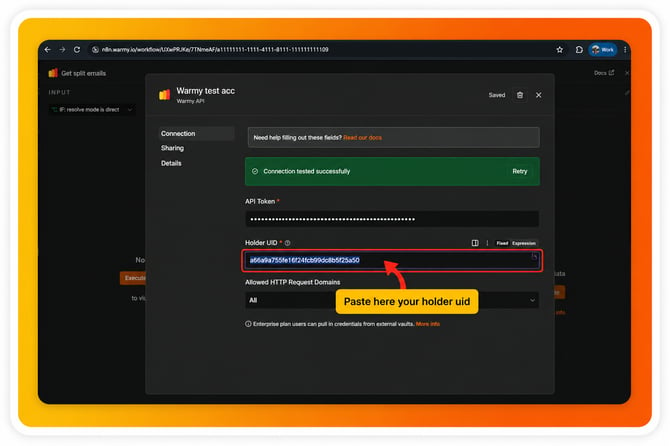
Paste the copied value into the Holder UID field. Click Save to store your updated credentials.
Your Warmy credentials are now fully configured. You can now close the Warmy node and continue configuring the workflow.
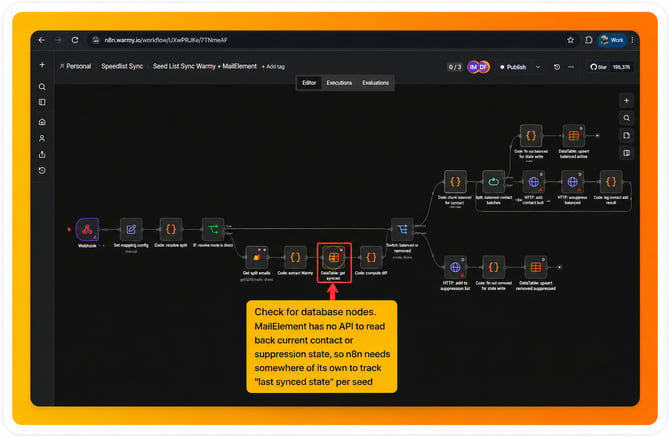
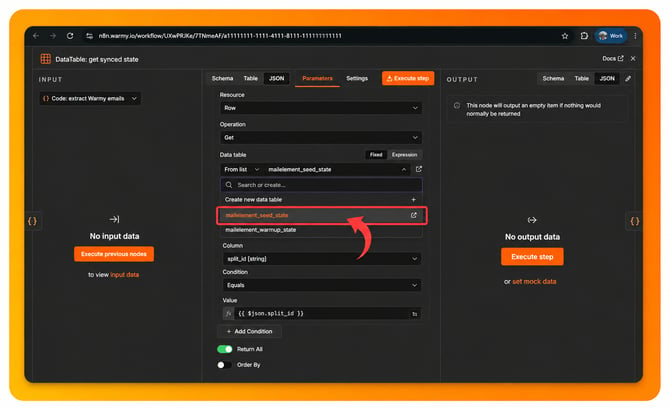
Locate the node named: DataTable: Get Synced State. Click the node to open its configuration. Locate the Data Table field. Next, click inside the dropdown list.
Later in this guide, you'll select the data table named: mailelement_seed_state
If it doesn't exist yet, don't worry. You'll create it in the next section. Close the node once you've reviewed its configuration.
Open a new browser tab and sign in to your n8n instance.
From the left-hand navigation menu, click Data Tables. Click the orange Create Data Table button.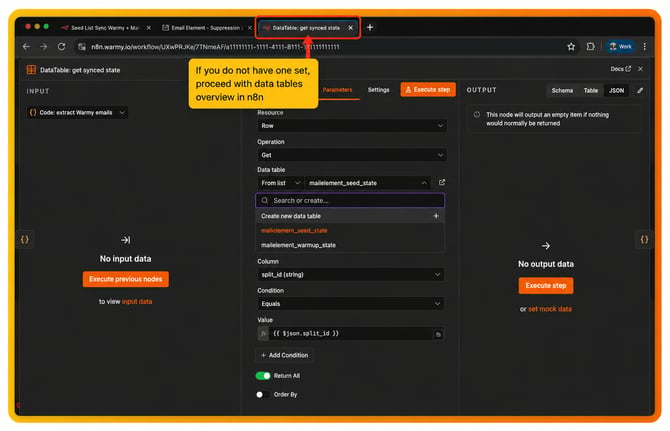
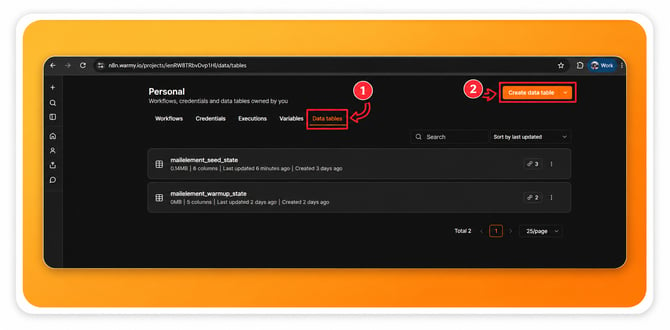
Note: Keep your original workflow tab open. You'll return to it after creating the Data Table.
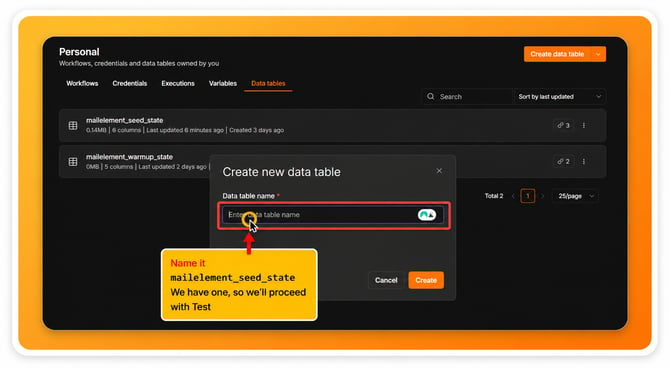
A dialog window will appear. Configure it as follows: Table Name like mailelement_seed_state.
For the creation method, leave From Scratch selected, then click Create.
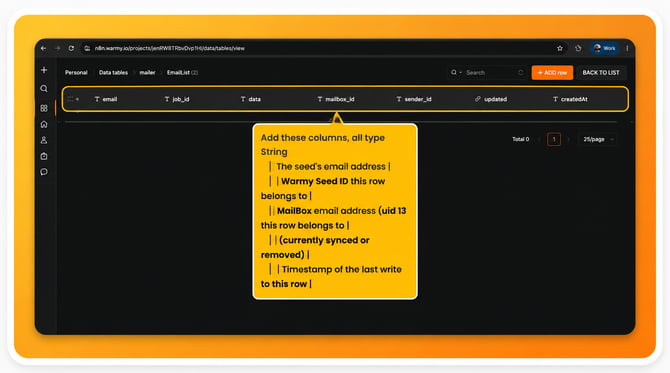
Once the table has been created, double-click it to open it. Next, click Add Column.
Create the following columns, and all columns should use the String data type. After adding all five columns, save the Data Table. Your Data Table is now ready to be used by the workflow.
| Column Name |
|---|
| The seed's email address |
| Warmy Split ID this row belongs to |
| MailElement Contact List ID this row belongs to |
| Status (currently synced or removed) |
| Timestamp of the last write to this row |
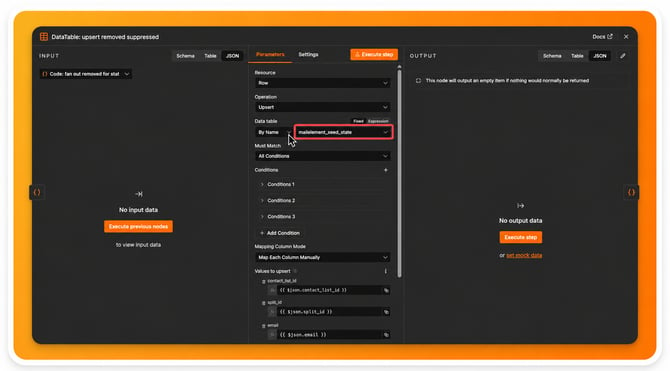
Return to your original n8n workflow tab. Open the DataTable: Get Synced State node again. In the Data Table field, select: mailelement_seed_state and close the node.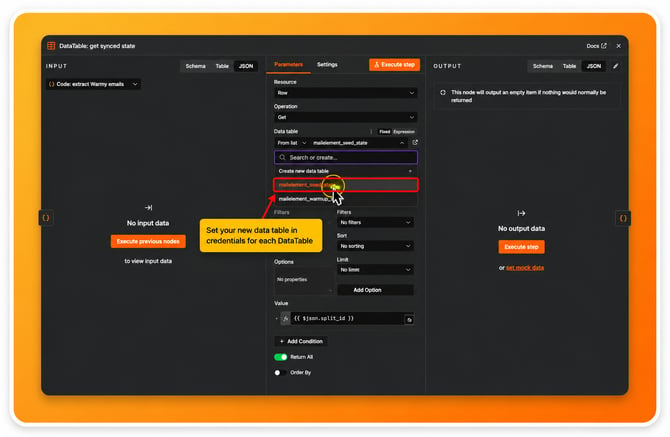
Next, open the node named: DataTable: Upsert Balanced Active. In the Data Table field, select: mailelement_seed_state and close the node.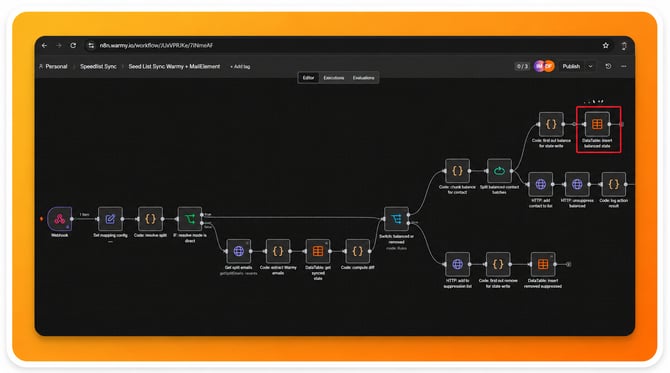
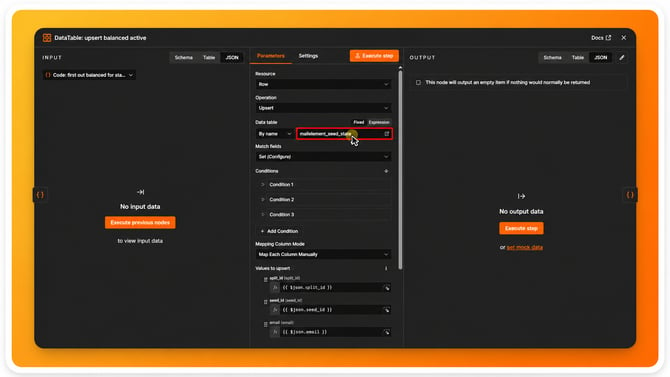
Repeat exactly the same process for the node named: DataTable: Upsert Removed Suppressed. Select the same Data Table. Close the node once you've finished. At this point, all Data Table nodes should be pointing to the same table.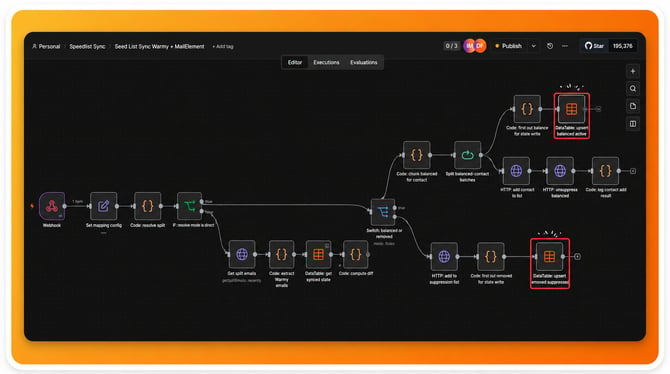
Before continuing, it's a good idea to perform one final verification. Open the Set: Mapping Config node again and review the JSON configuration and confirm that all values are correct, including:
- Contact List ID
- Suppression List ID
- Split ID
If everything looks correct, close the node. Your workflow configuration is now ready for the final authentication steps.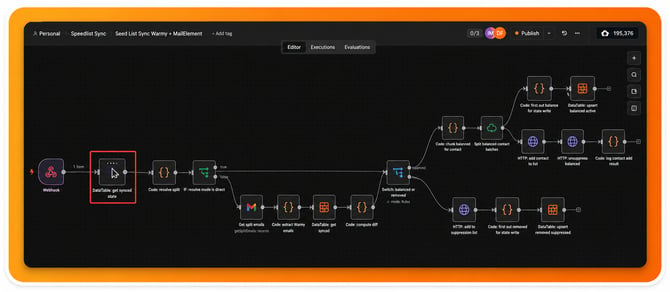
The workflow is almost ready. The next step is to create an API Key in EmailElement, so n8n can securely communicate with your EmailElement account.
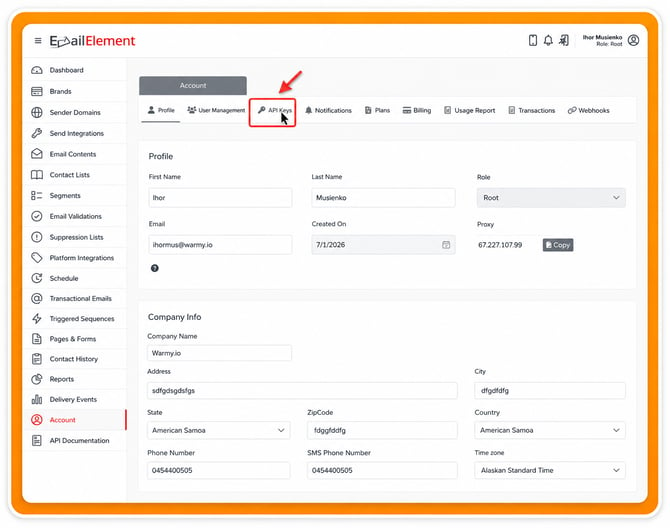
Return to your EmailElement dashboard. From the left-hand navigation menu, click Account. Next, select API Keys.
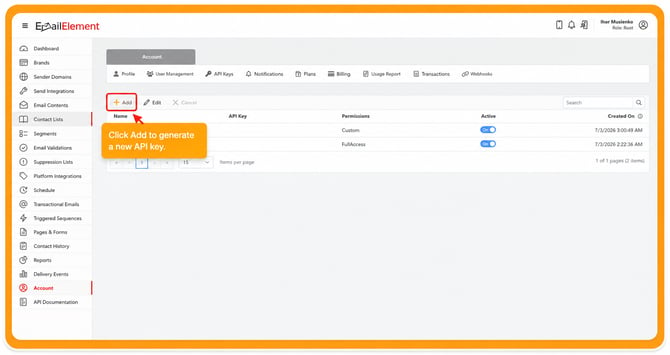
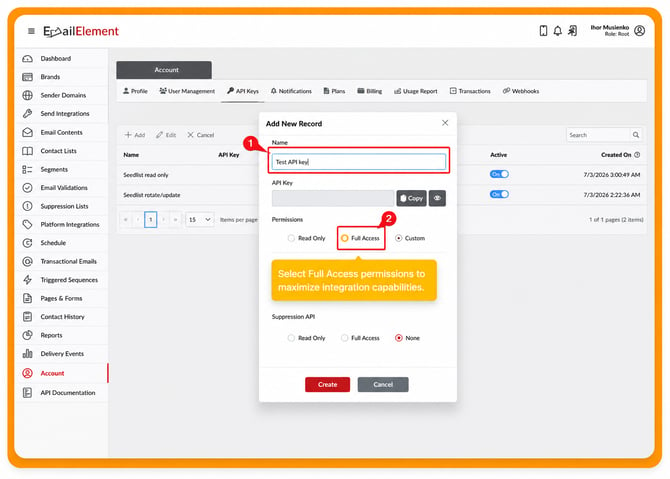
Click the + Add button. A dialog window will appear. In the Name field, enter a descriptive name that helps you identify the key later.
For this guide, we'll use: Test API Key. Under the Permissions section, select: Full Access and click Create.
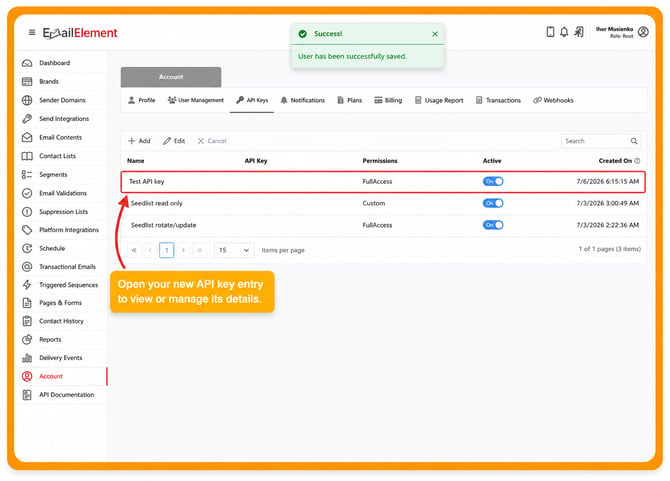
Once the API Key has been generated, open it and click Copy API Key. Keep the copied value available, as you'll use it immediately in the next step.
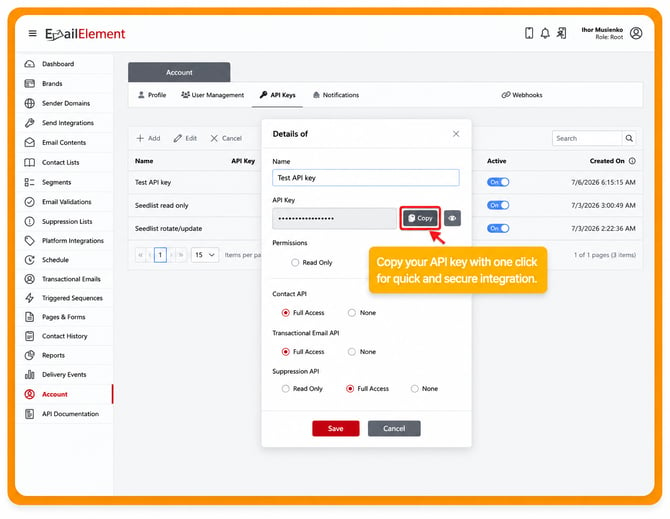
Now return to your n8n workflow. Locate the node named: HTTP: Add to Suppression List.
Click the node to open its configuration.
Locate the Authentication field. Open the dropdown menu and select: Generic Credential Type
A new option named Generic Auth Type will appear.
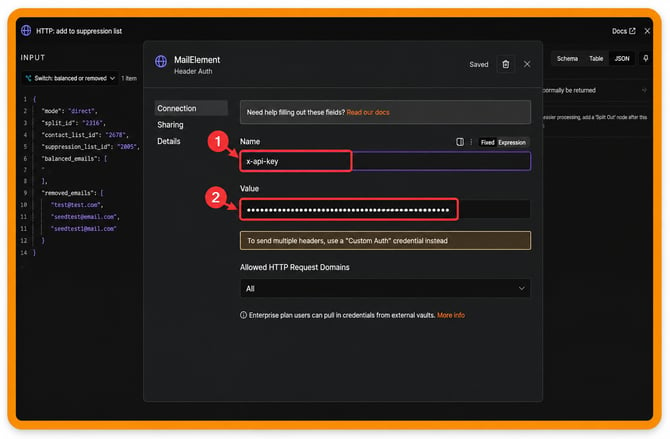
Select: Header Auth. In the Credentials field, choose your EmailElement credential. If it hasn't been created yet, click Edit and the credential configuration window will open.
Verify that the following values are configured correctly: name: x-api-key and the value: Paste the EmailElement API Key that you copied in the previous step.
Click Save. Close both the credentials window and the HTTP node. Your EmailElement authentication is now complete.
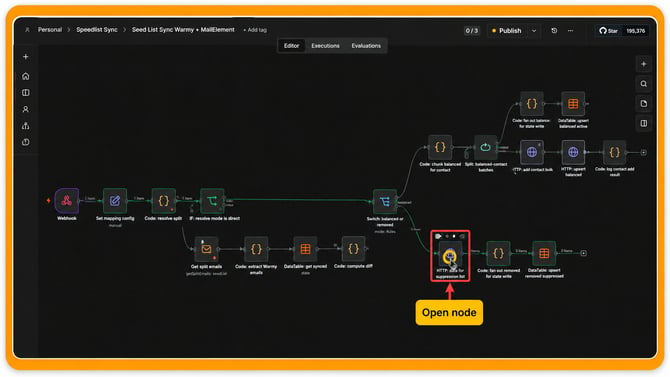
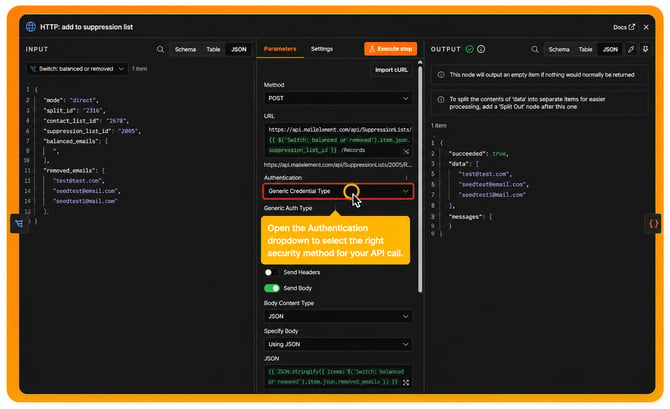
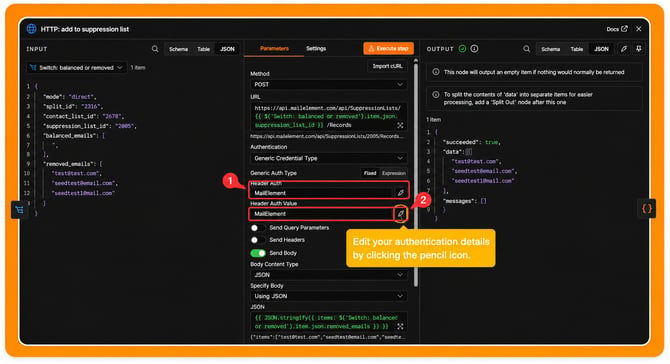
Before running the workflow, perform one final review to make sure every required component has been configured correctly.
Confirm that: Once everything has been verified, you're ready to test the automation.
Return to your EmailElement dashboard. Open Contact Lists. As the workflow executes, you'll begin to see your Warmy seed email addresses automatically synchronized into the Contact Lists that you configured earlier.
This synchronization is triggered by Warmy events and processed automatically by the n8n workflow. Depending on the number of Contact Lists you've configured, synchronization may occur in multiple stages. Allow the workflow to continue running until all Contact Lists have been processed.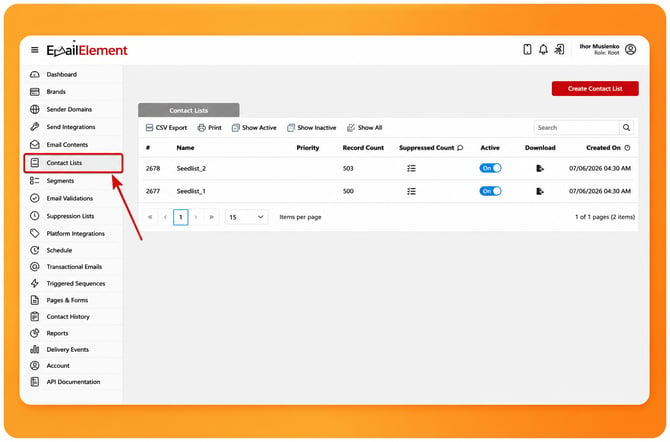
After the workflow finishes processing, refresh the Contact Lists page in EmailElement.
You should now see that the Warmy seed email addresses have been distributed across the Contact Lists created earlier.
For example:
- Seedlist_1
- Seedlist_2
Both lists should now contain synchronized seed email addresses.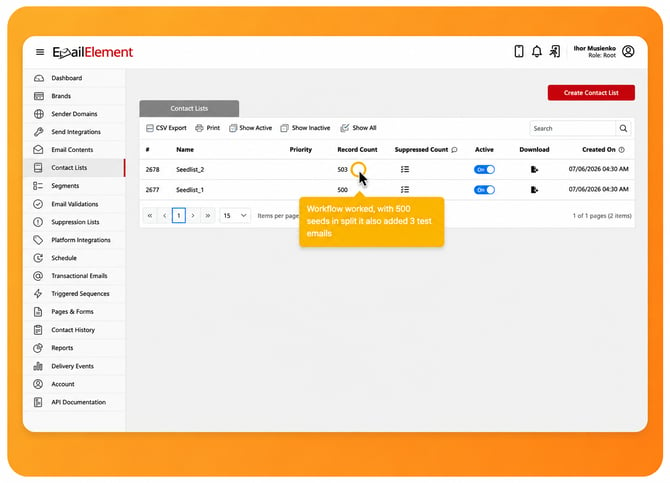
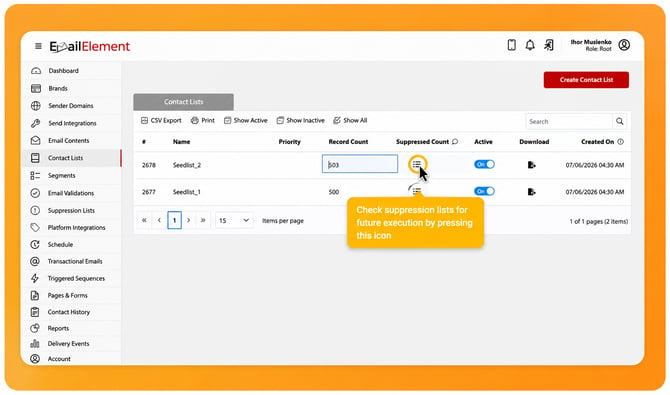
Next, verify that suppression synchronization is also working correctly. From the Contact Lists page, click the Suppressed Count icon for one of your Contact Lists.
The corresponding Suppression List should display the synchronized records generated by the workflow. Repeat this verification for your remaining Contact Lists if necessary.
One of the main purposes of this integration is keeping EmailElement synchronized whenever Warmy rotates seed email addresses.
Return to your n8n workflow and allow it to continue listening for webhook events.
When Warmy performs a rotation or update event, the webhook will automatically trigger the workflow.
Once the execution finishes, return to EmailElement. Refresh the Contact Lists page.
You'll notice that the synchronized seed email addresses have been updated automatically.
No manual intervention is required.
You can also open the Suppressed Count for each Contact List to confirm that removed seed email addresses have been correctly transferred to the Suppression List.
This verifies that both active and removed seeds are being synchronized successfully.