---
title: Zapier Integration
description: Learn how to connect Warmy with Zapier to automate your email warm-up workflows. Step-by-step guide to setting up your first Zap and integrating Warmy with your favorite apps.
---
[Skip to content](https://support.warmy.io/knowledge/zapier-integration#main-content)
English
Show submenu for translations
![Group 1261151152.png\]](https://support.warmy.io/hs-fs/hubfs/Group%201261151152.png?width=50&height=50&name=Group%201261151152.png)
Open main navigation
Close main navigation
- English
Show submenu for translations
- [Go to warmy.io](https://www.warmy.io/)
[Go to warmy.io](https://www.warmy.io/)
Hey there Warmer! How can we help? 🙏
- There are no suggestions because the search field is empty.
1. [Help Center](https://support.warmy.io/knowledge?hsLang=en)
2. [Integrations](https://support.warmy.io/knowledge/integrations?hsLang=en)
# Zapier Integration
## Automate your email warm-up workflow by connecting Warmy to Zapier 😊
### 🎧 Prefer to listen? Hit play to hear this article read aloud.
### How to Connect Warmy to Zapier and Set Up the Mailbox Deliverability Checker
This guide walks you through connecting Warmy to Zapier and building a full automation workflow — from creating a mailbox and running deliverability checks to managing templates and seed lists.
---
### Step 1 — Find Warmy in Zapier
1. In Zapier, click **Explore Apps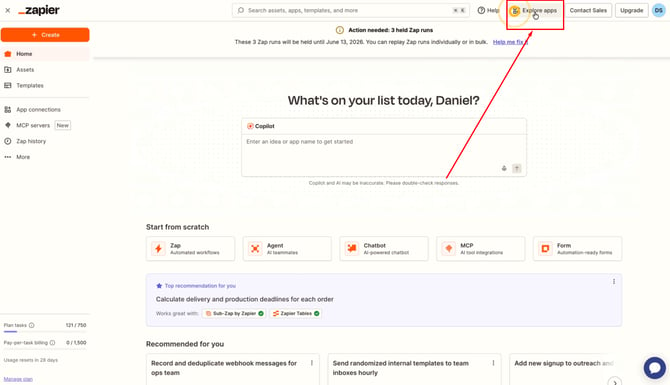**
2. Type **Warmy** in the search bar and select it from the results
3. Click on **Warmy** to open the app
---
### Step 2 — Set Up the Trigger
1. Click on the **Trigger Event** field and select the trigger you need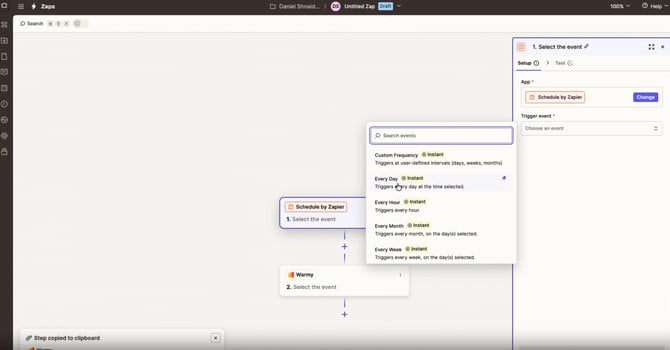
2. Click **Continue**
3. Choose the time you want the trigger to run
4. Click **Continue** again, then click **Test** to verify the trigger is working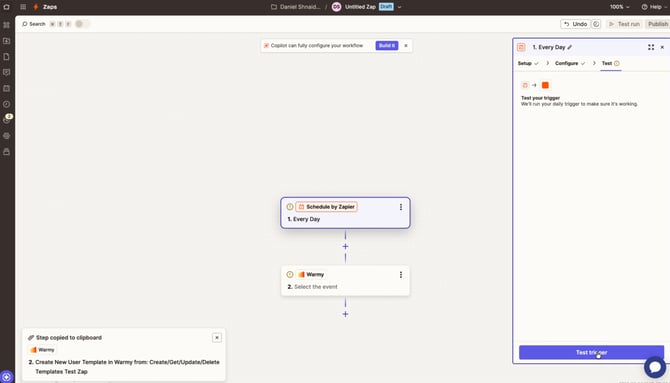
✅ You should see a confirmation message that the trigger fired successfully.
---
### Step 3 — Create a Mailbox Action
1. Click on the **Action Event** field and select **Create Mailbox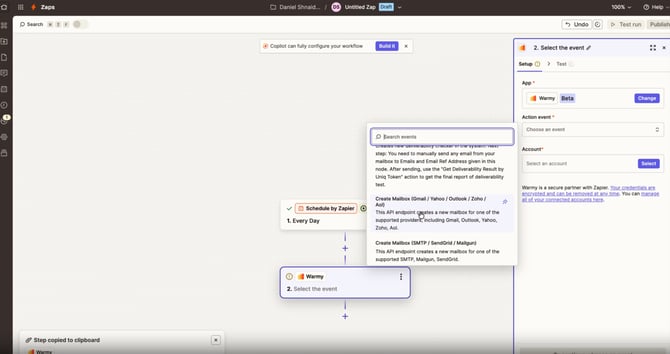**
2. Click on the **Account** field and select **Connect a new Account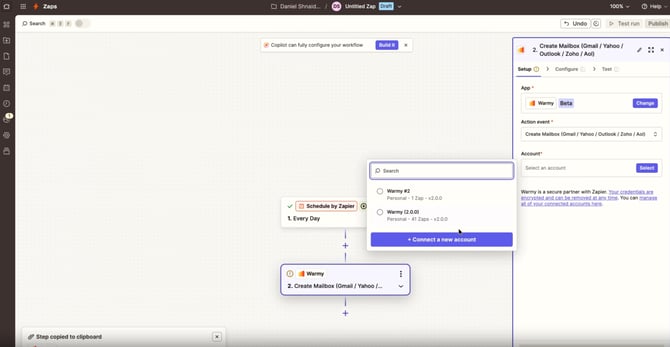**
#### Generate your API Key in Warmy
Before connecting, you'll need to generate your Warmy API key:
1. Log in to your Warmy account and click **Go to Dashboard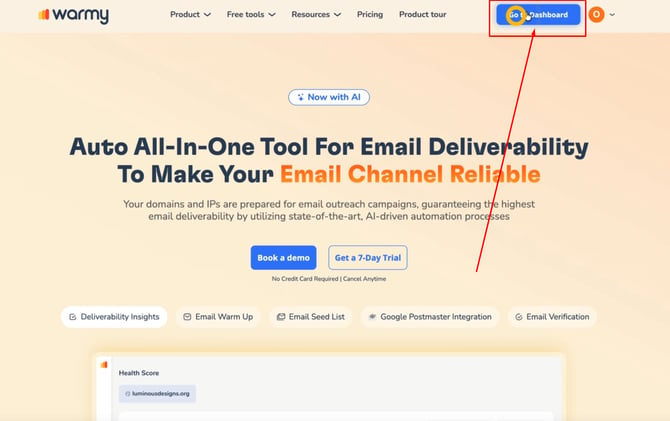**
2. In the top left corner, click on your **Workspace ID** and select **Settings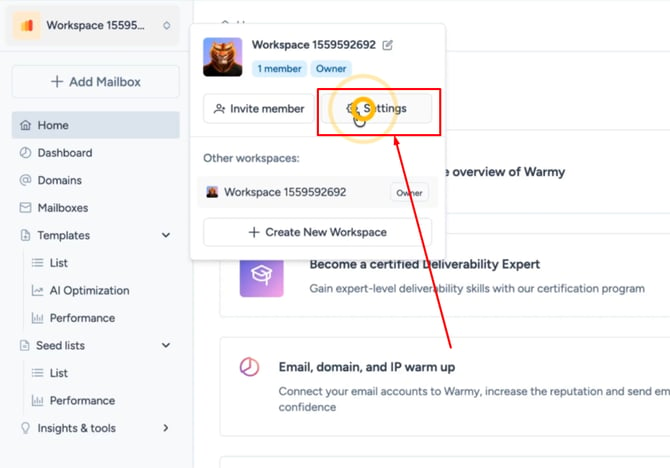**
3. Find the **API Keys** section and click **Add API Key**
4. Enter a name to identify this key, then click **Create Key**
5. Copy your API key
Back in Zapier, paste the API key and click **Yes, Continue to Warmy**.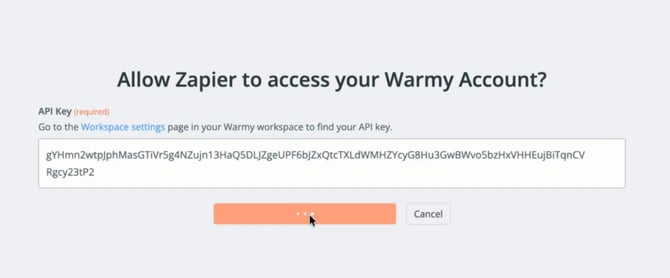
#### Complete the Mailbox Setup
1. In Zapier, click on the **Accounts** field and select the account you just connected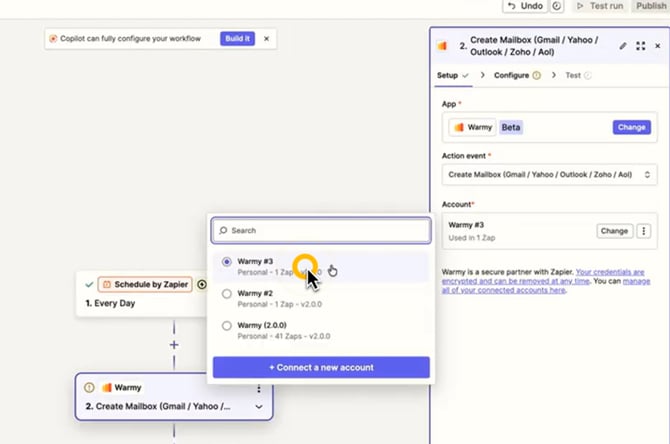
2. Click **Continue**
3. Fill in your mailbox details:
- Select your **provider**
- Enter your **email address**
- Enter your **app password**
- Enter your **From Name**
- Choose your **tariff plan**
4. Click **Continue**, then click **Test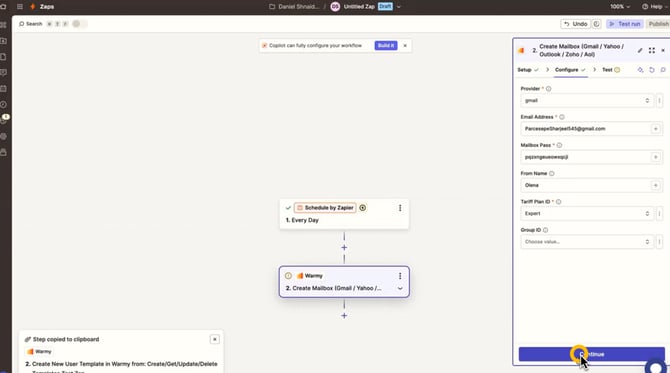**
✅ You should see a confirmation that your mailbox was successfully added.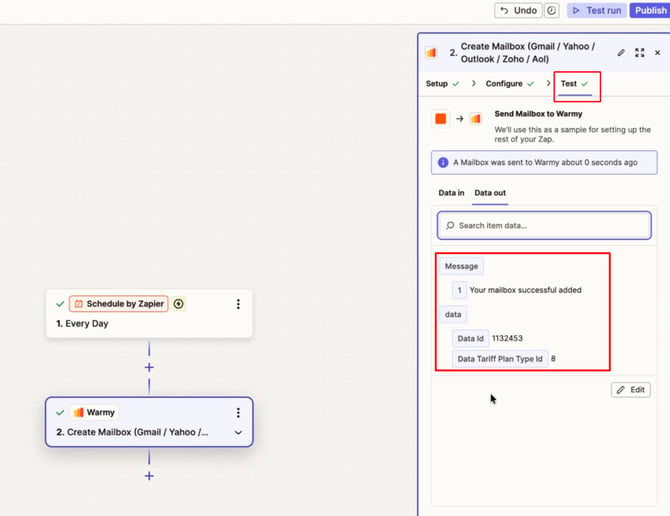
---
### Step 4 — Set Up the Deliverability Checker
1. Click **+ Add Step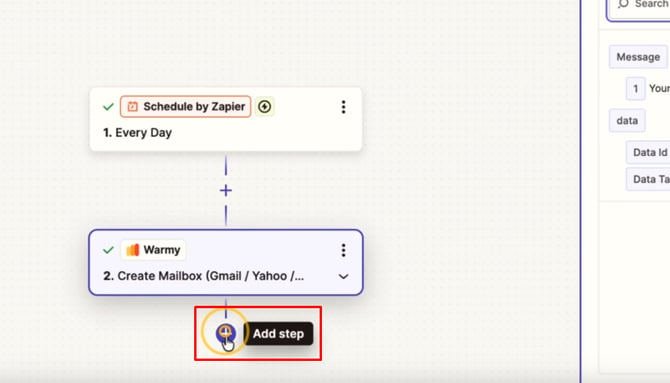**
2. From the app list, select **Warmy**
3. In the **Action Event** field, select **Create Mailbox Deliverability Checker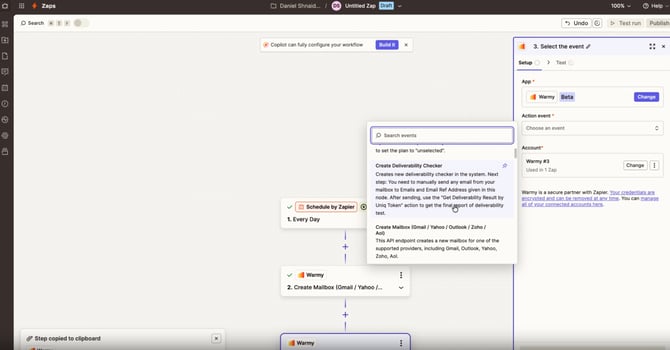**
4. Click **Continue** and select the mailbox you need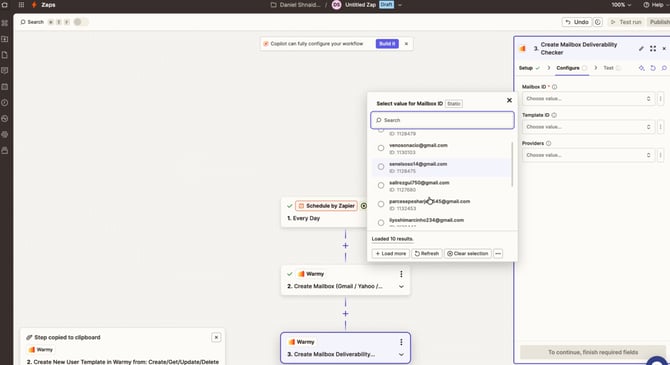
5. Choose the providers you want to run the deliverability test on
6. Click **Continue** and run a test to confirm everything works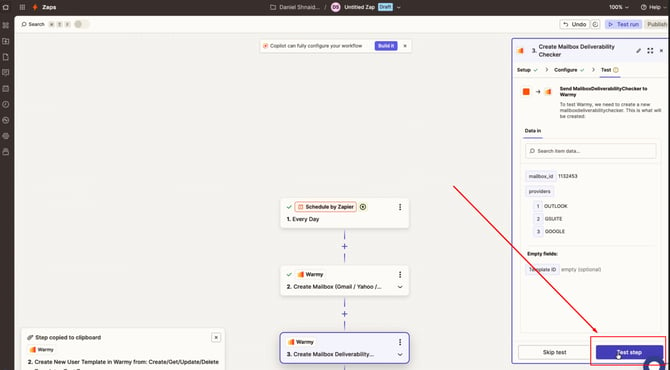
---
### Step 5 — Get Deliverability Check Results
1. Click **+** and search for **Warmy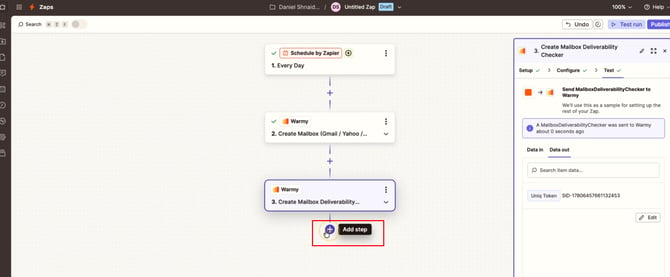**
2. In the **Action Event** field, select **Get Mailbox Deliverability Check Result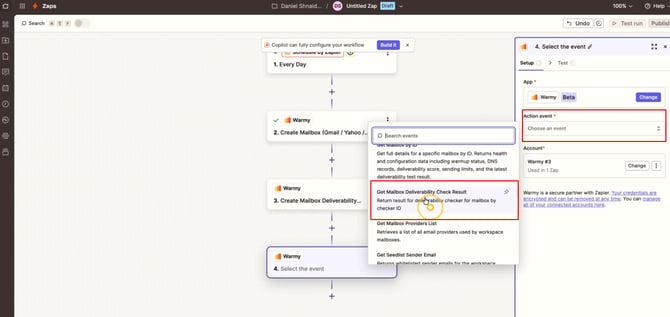**
3. Select your mailbox in the **Mailbox ID** field
4. Click on the **Unique Token** field and click **+**
5. Find **Section 3 — Create Mailbox Deliverability Checker** and select the **Unique Token** from it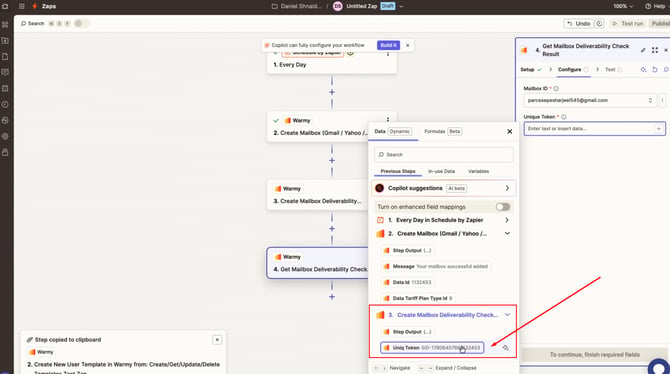
6. Click **Continue** and run a test
---
### Step 6 — Retrieve Seed List Emails
1. Click **+** and search for **Warmy**
2. In the **Action Event** field, select **Retrieve Seed List Emails**
3. Click **Continue**
4. Find your split in the **User Split ID** field and run a test
---
### Step 7 — Update User Split
1. Click **+**, select an app, and choose **Warmy**
2. In the **Action Event** field, select **Update User Split**
3. Click **Continue**
4. Click on the **User Split ID** field and select your split
5. In the **Senders** field, enter your email address in **JSON format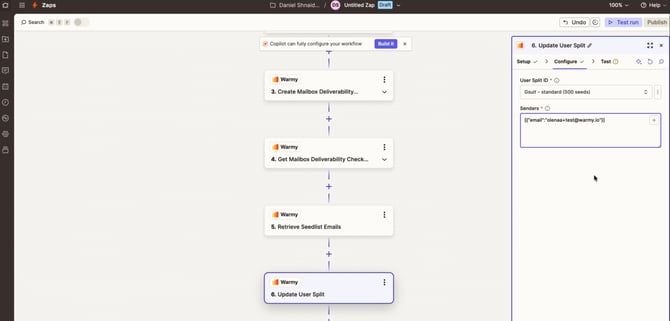**
⚠️ **Important:** If you type your email without JSON formatting, you will get an error. Make sure to use the correct format.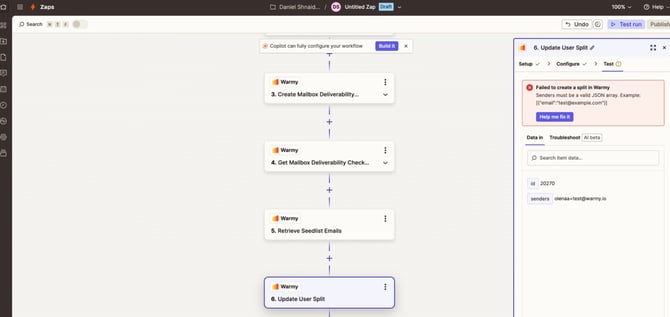
1. Click **Continue** and run a test
---
### Step 8 — Retrieve User Splits
1. Click **+** and select **Warmy**
2. In the **Action Event** field, select **Retrieve User Splits**
3. Click **Continue**
4. Optionally filter by **provider** or **group**
5. Run a test
---
### Step 9 — Retrieve Split by ID
1. Click **+** and select **Warmy**
2. In the **Action Event** field, select **Retrieve Split by ID**
3. Click **Continue**
4. Choose your **User Split ID**
5. Click **Continue** and run a test
---
### Step 10 — Create a New User Template
1. Click **+**, select **Warmy**
2. In the **Action Event** field, select **Create New User Template**
3. Click **Continue**
4. Fill in the template settings:
- Subject
- Body
- Language Code
- Appearance
- Template Name
- Mailbox IDs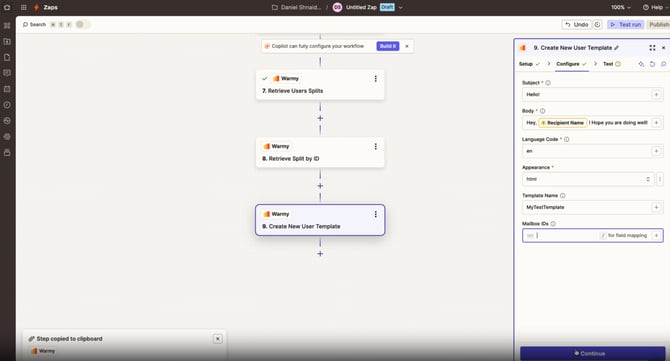
5. Click **Continue** and run a test
---
### Step 11 — Get All Templates
1. Click **+** and select **Warmy**
2. In the **Action Event** field, select **Get All Templates**
3. Click **Continue** and run a test
---
### Step 12 — Update a Template by ID
1. Click **+** and select **Warmy**
2. In the **Action Event** field, select **Update Template by ID**
3. Click **Continue**
4. Select the template you need using the **Template ID** field
5. Make your changes, click **Continue** and run a test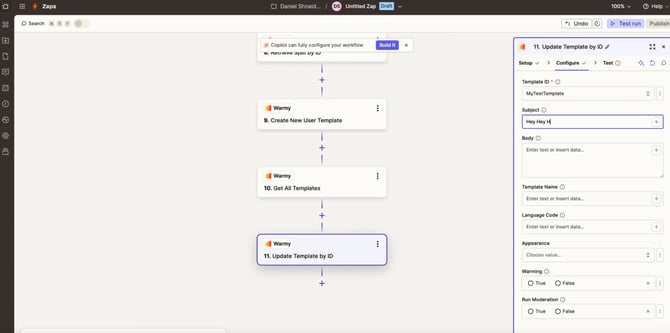
---
### Step 13 — Get Info on All Templates
1. Click **+** and select **Warmy**
2. In the **Action Event** field, select **Get Info All Templates**
3. Click **Continue** and run a test
---
### 🎉 You're All Set!
You've successfully connected Warmy to Zapier and built a complete automation workflow — covering mailbox creation, deliverability checks, seed list management, and template handling.
With this Zap running automatically every day, Warmy takes care of your email warm-up in the background while you focus on what matters.
If you have any questions, feel free to reach out to our support team via live chat at **[hi@warmy.io](mailto:hi@warmy.io)** or through **WhatsApp**.
#### [Need help? **Schedule a call with us 👨🏻💻**](https://www.warmy.io/book-a-support-call)
- [Connection Guide](https://support.warmy.io/knowledge/connection-guide?hsLang=en)
- [General questions](https://support.warmy.io/knowledge/general-questions?hsLang=en)
- [Technical questions](https://support.warmy.io/knowledge/technical-questions?hsLang=en#main-content)
- [SPF and DKIM Configuration](https://support.warmy.io/knowledge/technical-questions?hsLang=en#spf-and-dkim-configuration)
- [Subscription](https://support.warmy.io/knowledge/subscription?hsLang=en)
- [Collaborate](https://support.warmy.io/knowledge/collaborate?hsLang=en)
- [Features](https://support.warmy.io/knowledge/features?hsLang=en)
- [Troubleshooting](https://support.warmy.io/knowledge/troubleshooting?hsLang=en#main-content)
- [SMTP Errors](https://support.warmy.io/knowledge/troubleshooting?hsLang=en#smtp-errors)
- [Service-related issues](https://support.warmy.io/knowledge/troubleshooting?hsLang=en#service-related-issues)
- [Integrations](https://support.warmy.io/knowledge/integrations?hsLang=en#main-content)
- [Seed List Automations](https://support.warmy.io/knowledge/integrations?hsLang=en#seed-list-automations)
[](https://www.warmy.io/)
warmy.io Help Center
Copyright © 2026, AnyBiz LTD